Full guides for Download and update firmware on you device official firmware cnh est dpa5 adapter
Upgrade to newest version firmware on you device, official firmware cnh est dpa5 adapter update you current version firmware to latest version, download newest firmware.
Download new release software and update firmware last version:
This article is about how to perform 4th generation Mercedes Benz gearbox clone with Launch X431 Pad V/Pad VII Plus X-Prog3 GIII (update software to immobilizer programmer V10.06).
Here we go for the operation guide:
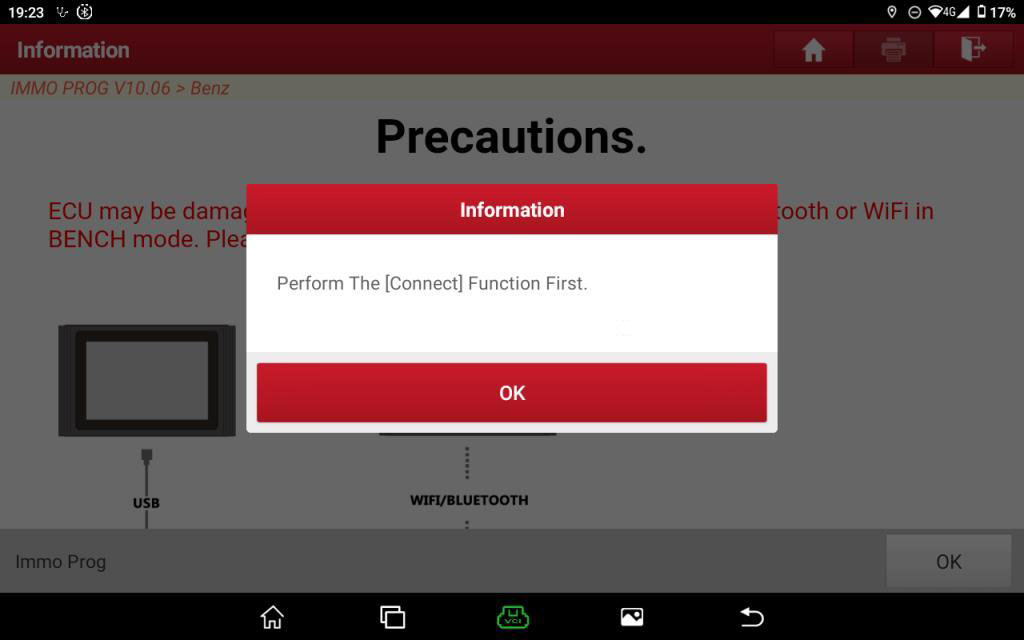
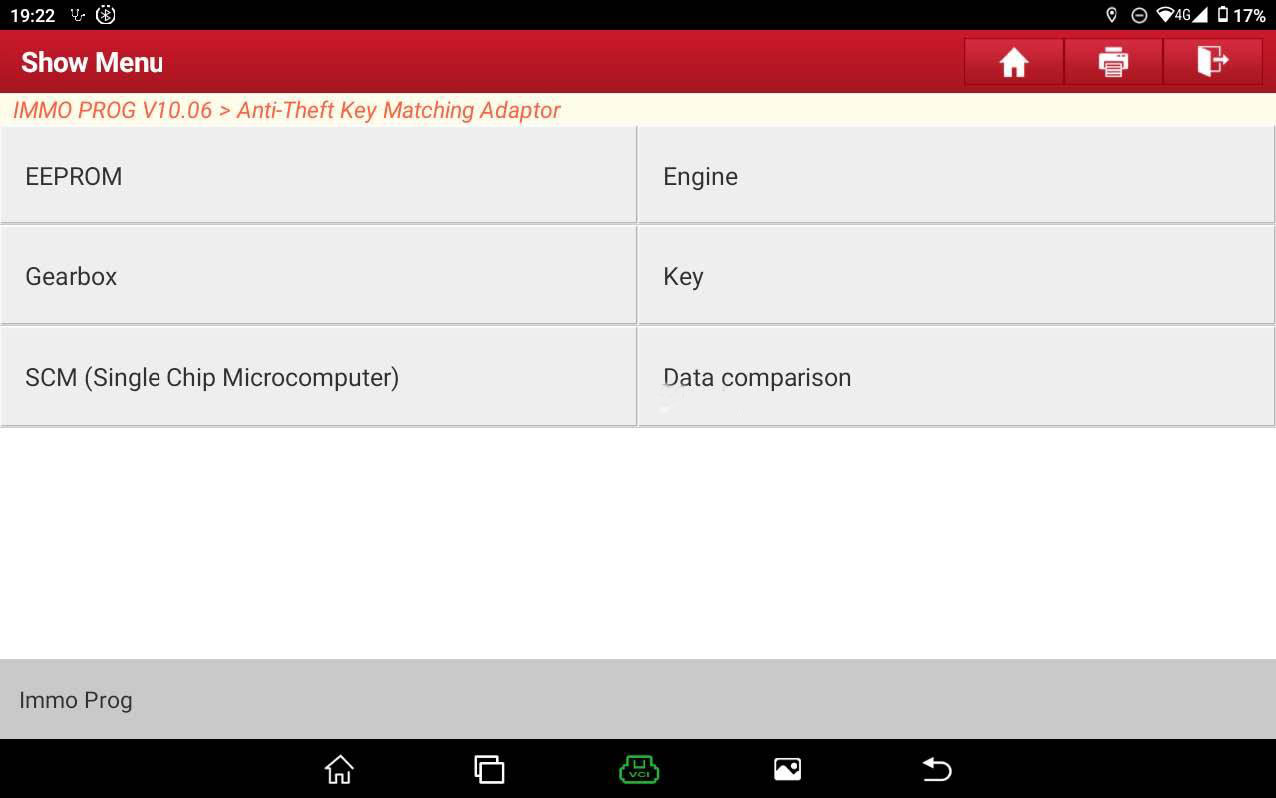
1.Select the Anti-theft programmer software, click [OK] -> [OK] to enter.
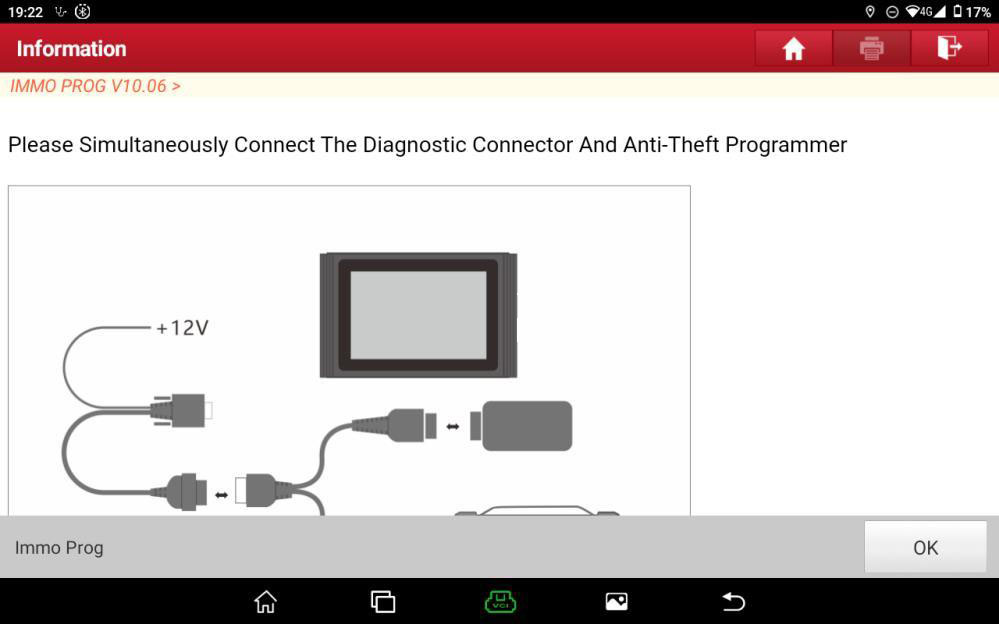
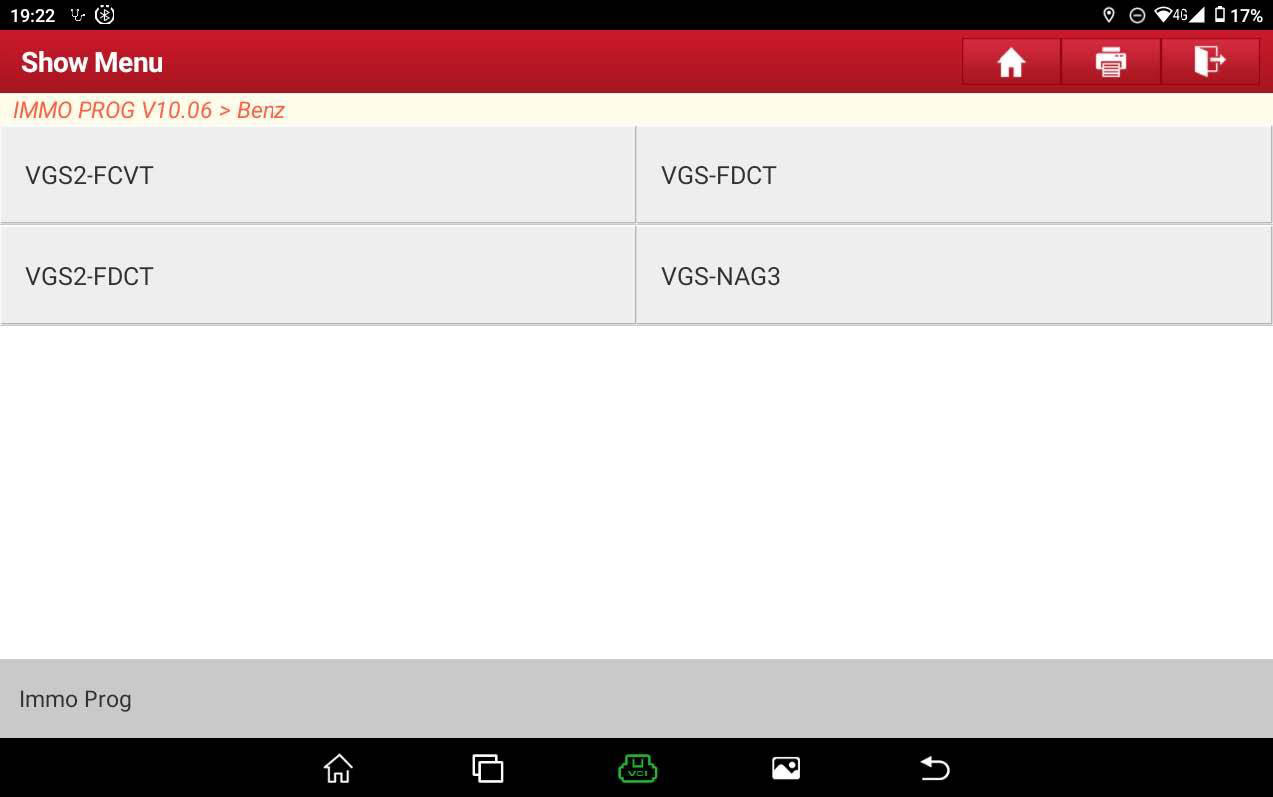
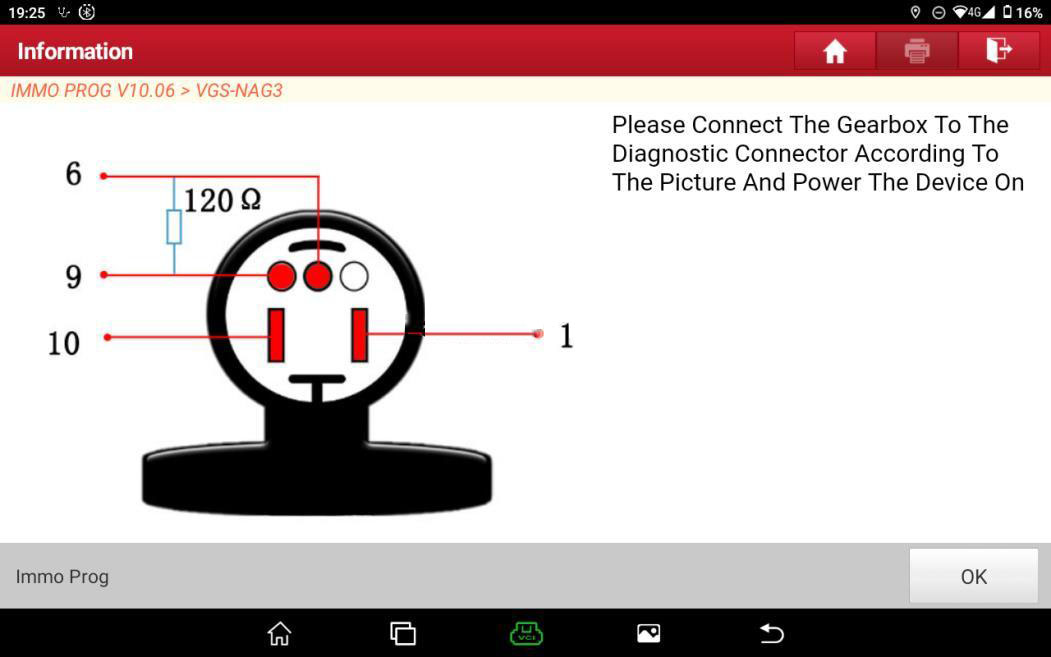
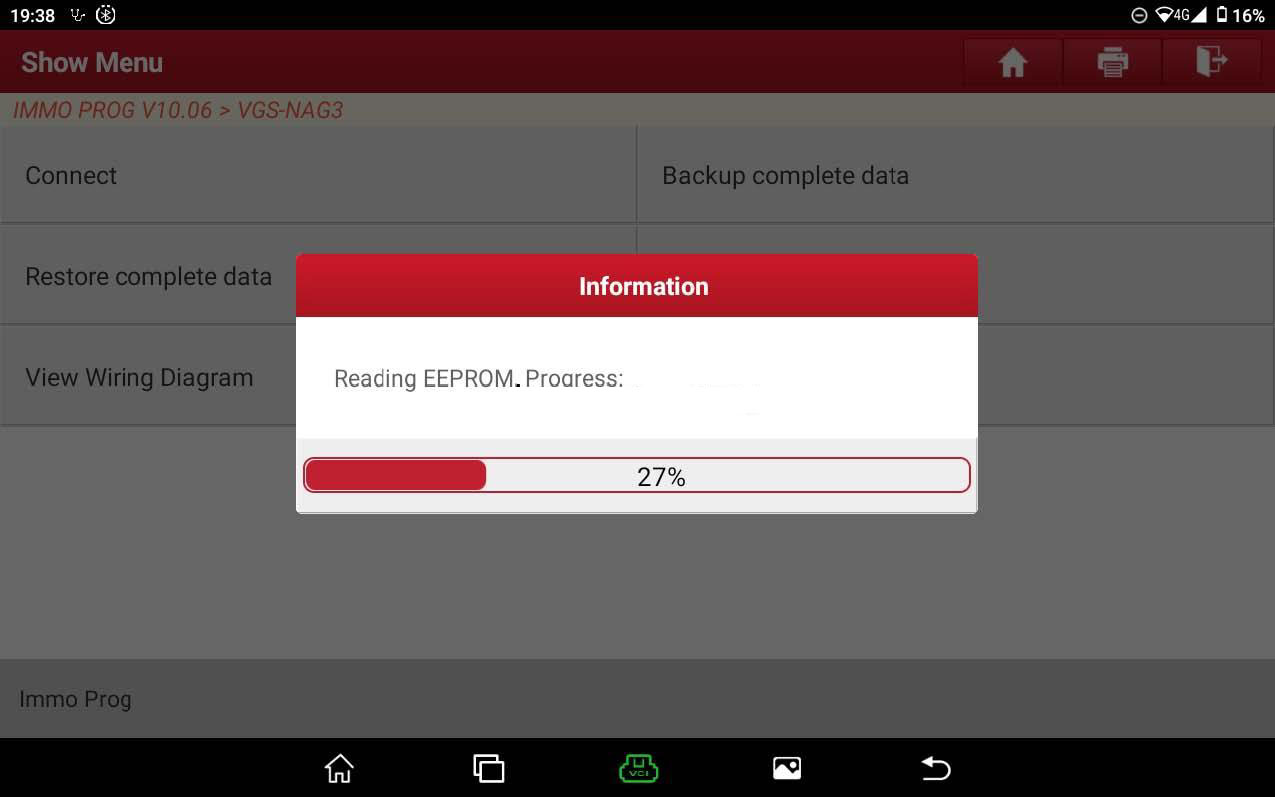
2.Connect the Immobilizer programmer as shown in Figure 1, and select 【Gearbox】-> 【Benz】-> 【VGS-NAG3】
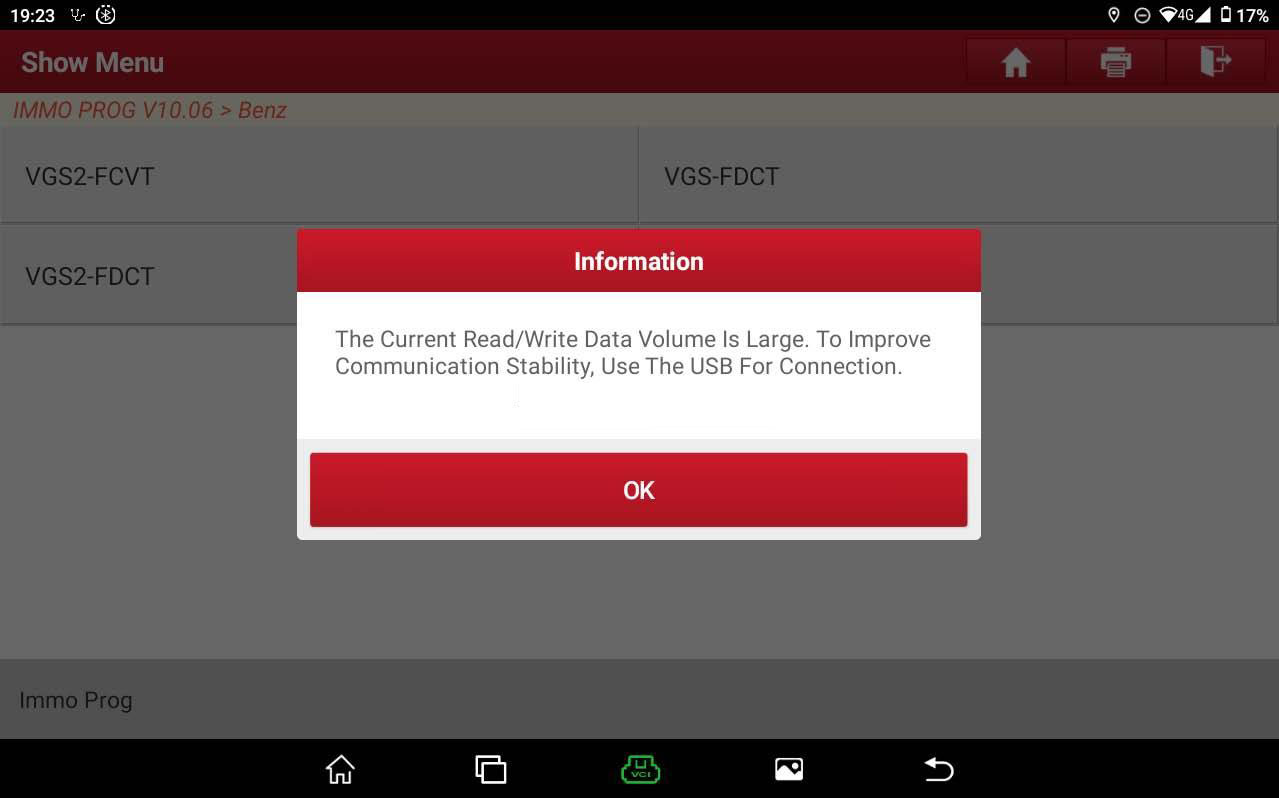
3.The current Read/Write data volume is large. To improve communication stability, please use the USB for connection.
4.Click “OK”, please perform the [Connect] function first.
5.Select 【View Wiring Diagram】, disassemble the original gearbox and connect the Immobilizer programmer with harness.
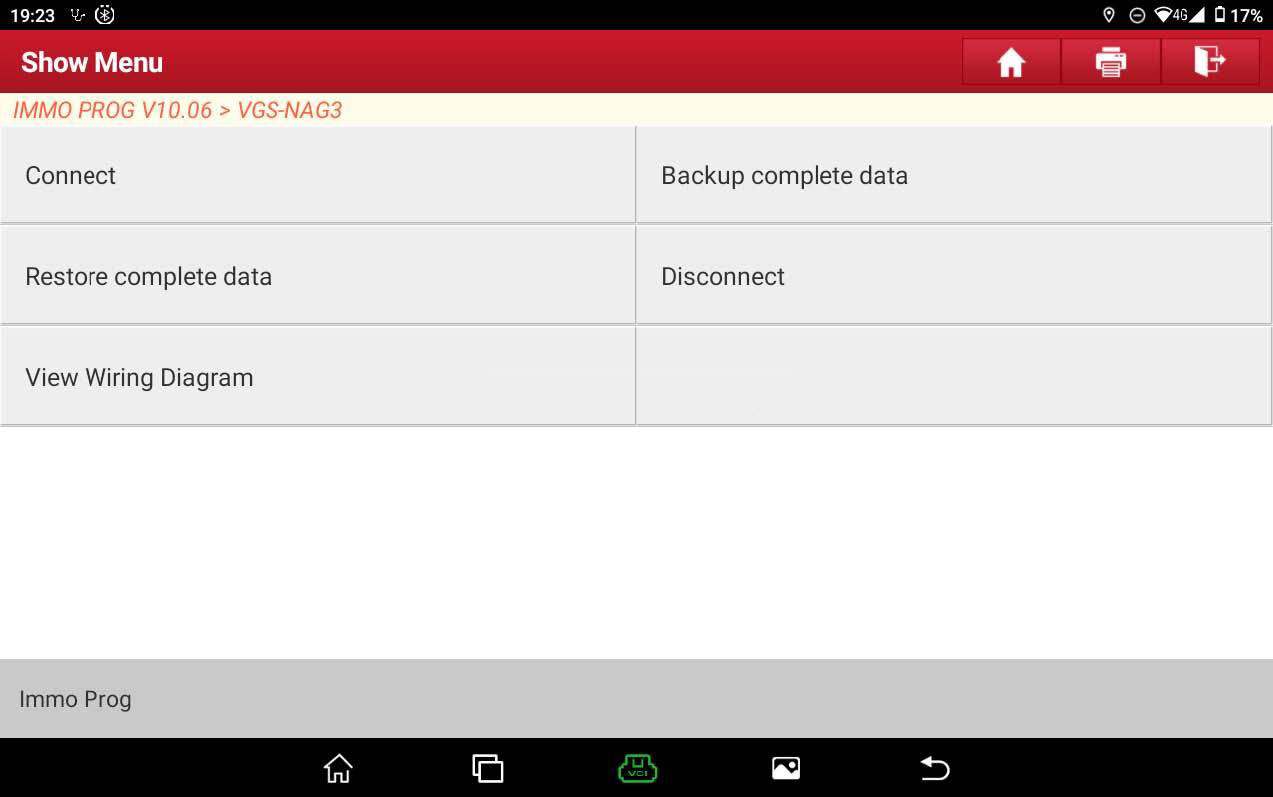
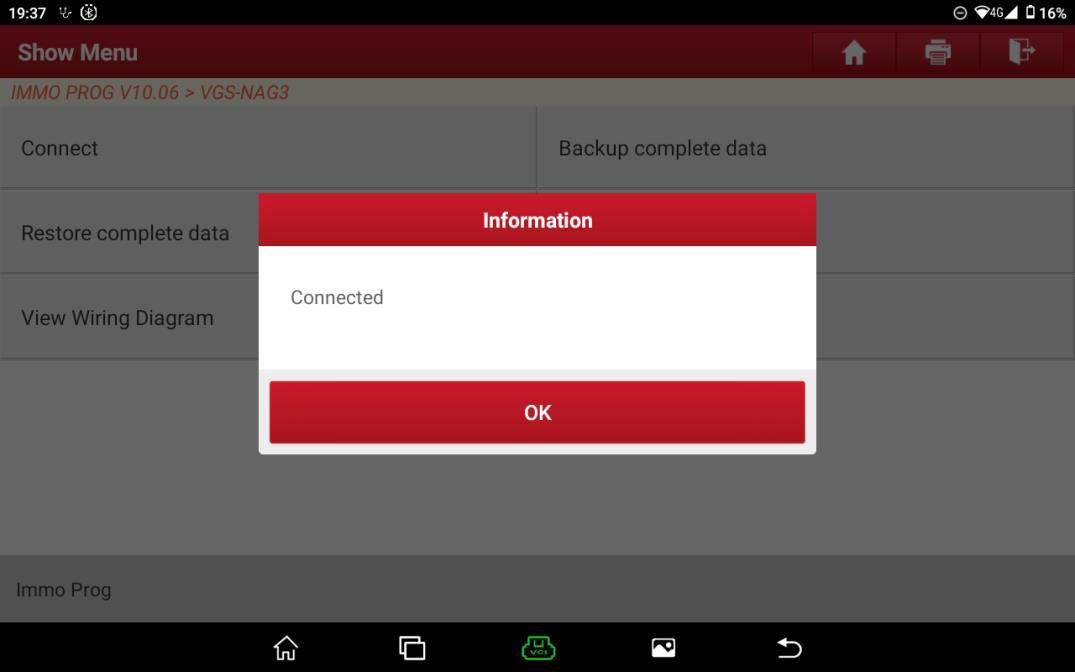
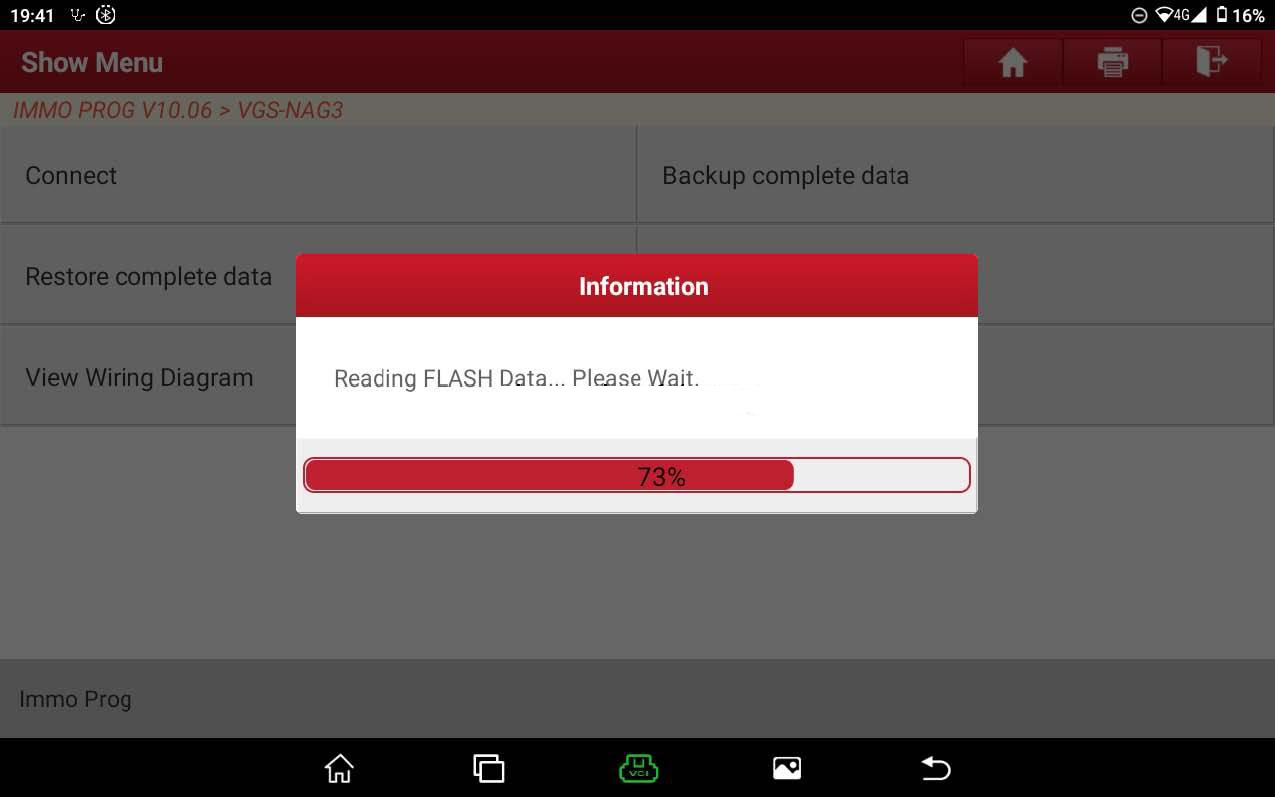
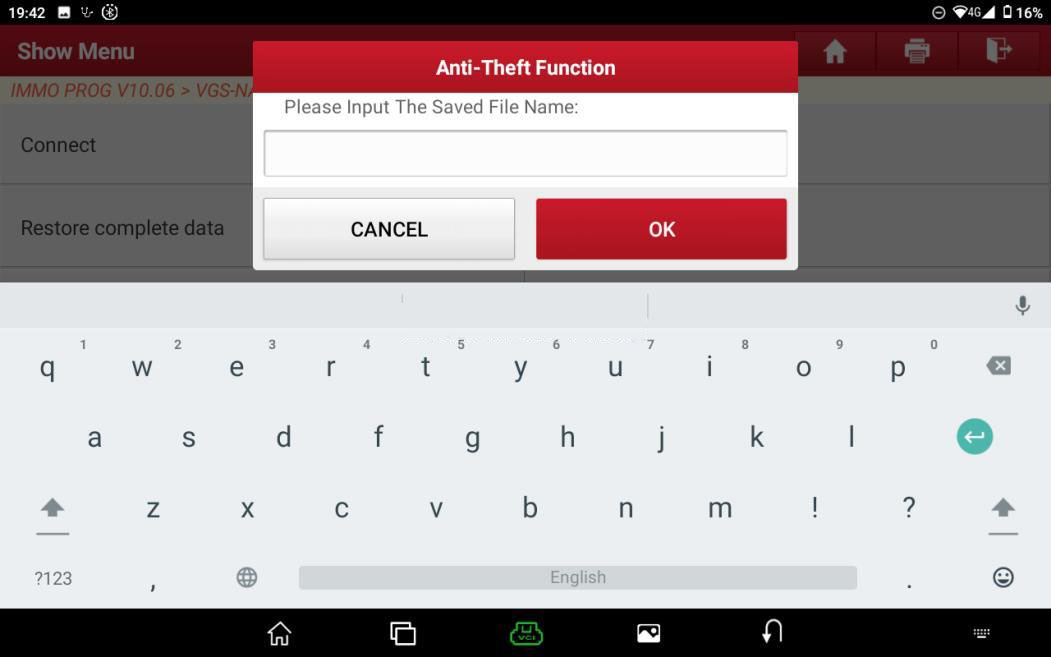
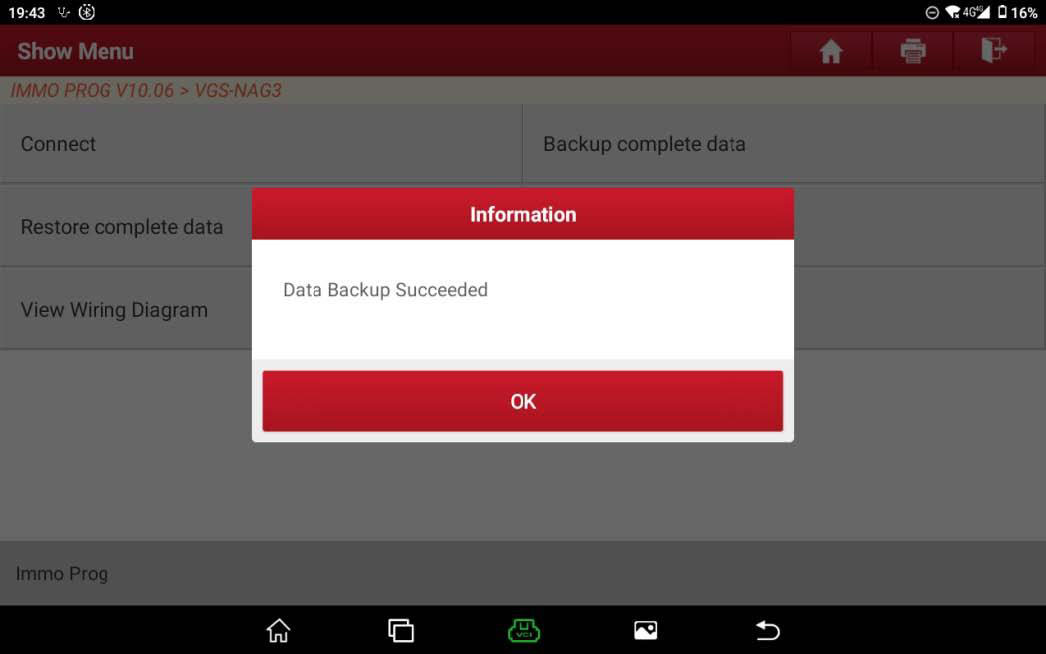
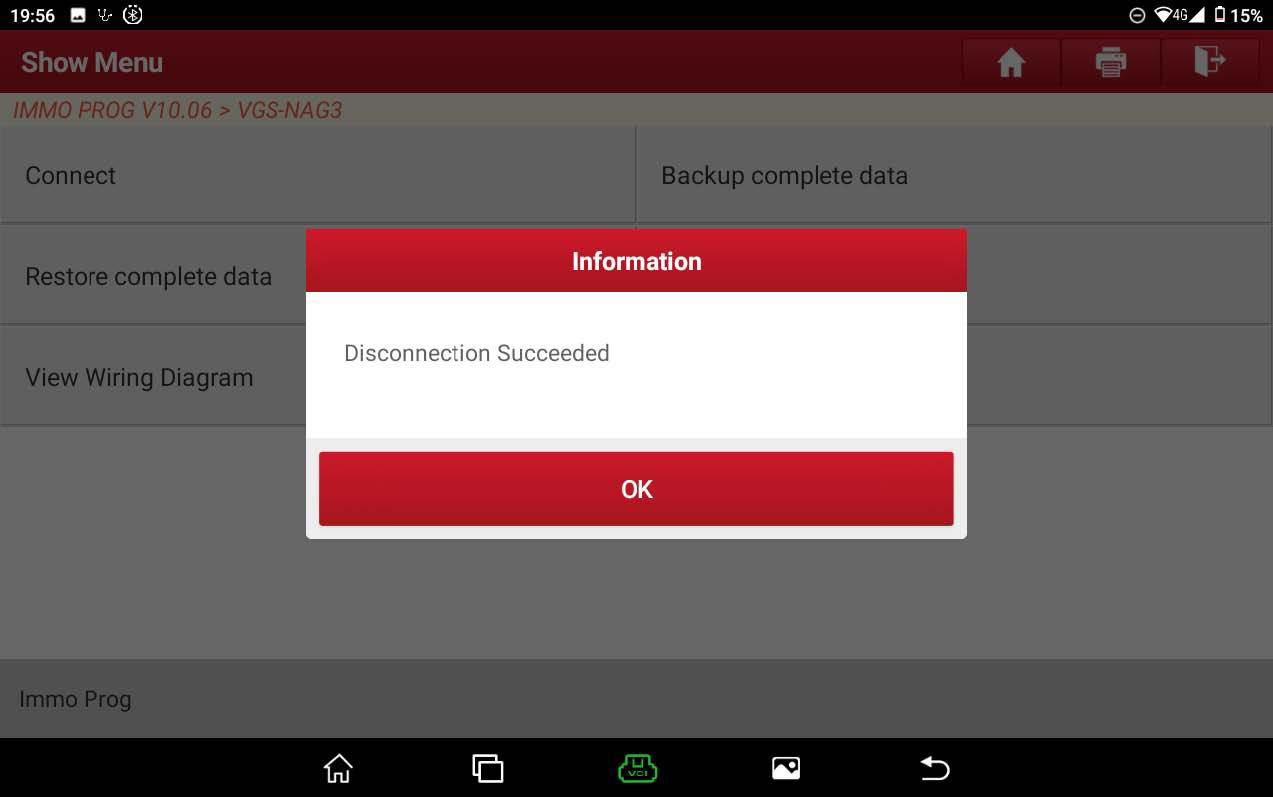
6.Before performing operations of other functions, please first perform the [Connect] function to verify whether the gearbox is connected to the programmer. 7.Click [OK] and then click [Backup complete data] as shown in Figure 8 and 9, to backup and save the internal data of original gearbox. 8.Click 【Disconnect】to disconnect the original gearbox and the Immobilizer programmer.
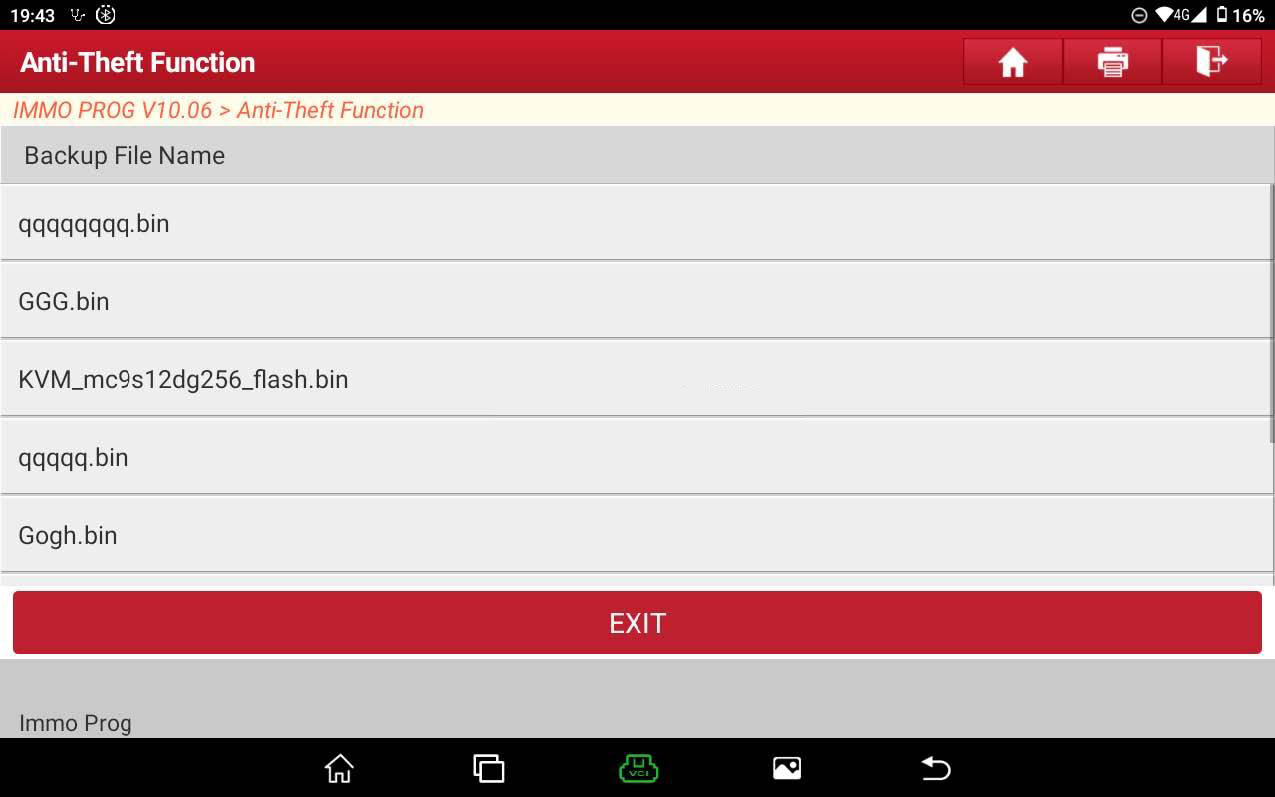
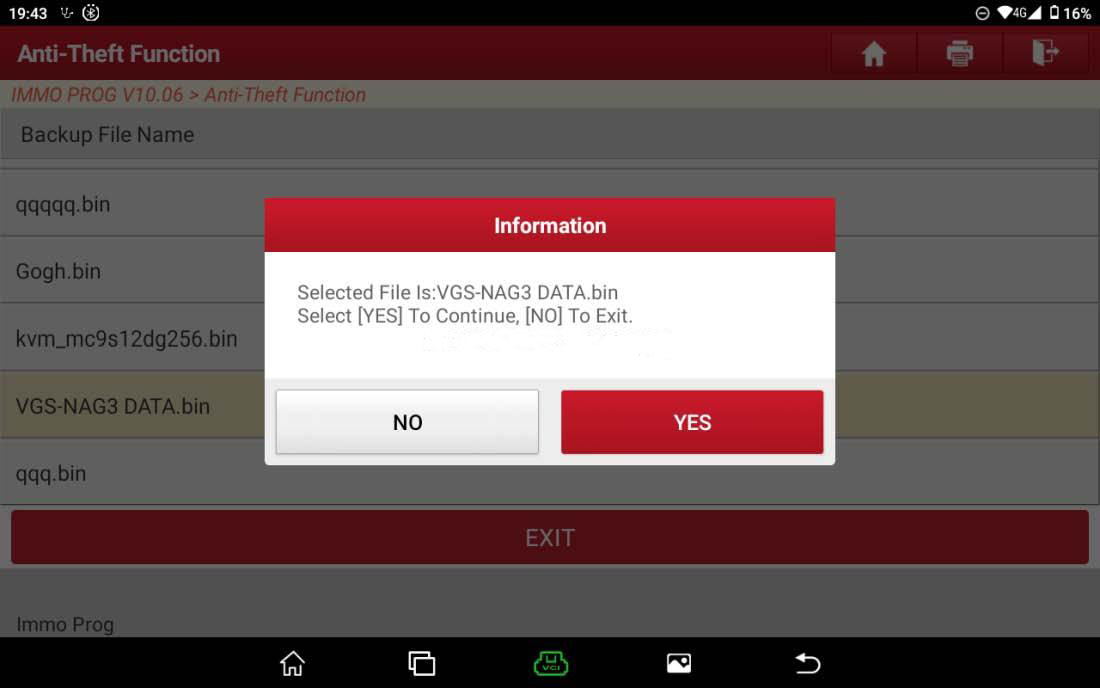
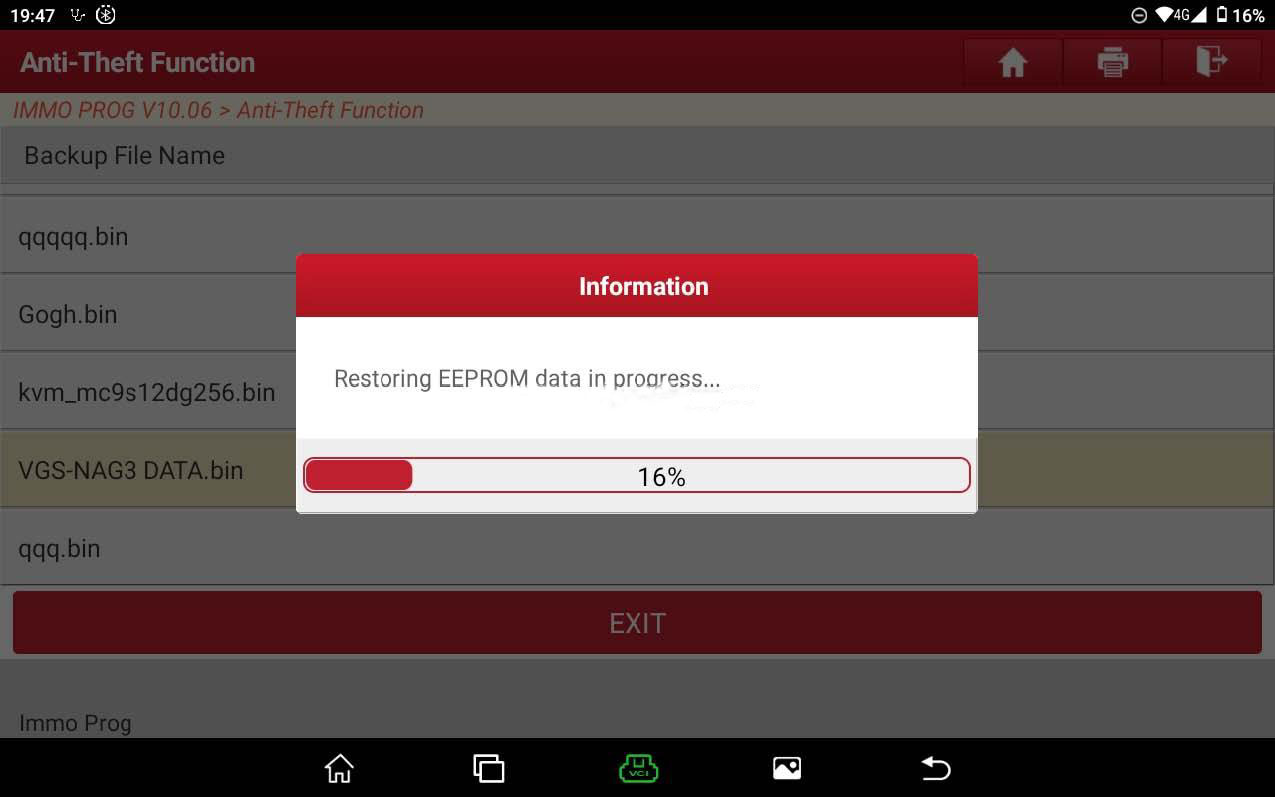
9.Perform step 5 and step 6 again to connect the external gearbox with the Immobilizer programmer; 10.Click [Restore complete data], select the data backed up in step 7; click “Yes” to write the data of original gearbox to the external gearbox.
11.Here the cloning for gearbox has been basically completed, but in order to determine whether the data of original gearbox has actually been written into the external gearbox, click [Backup complete data], back up the data of external gearbox at this time, and click [Disconnect], and then click the Return button to return to the interface.
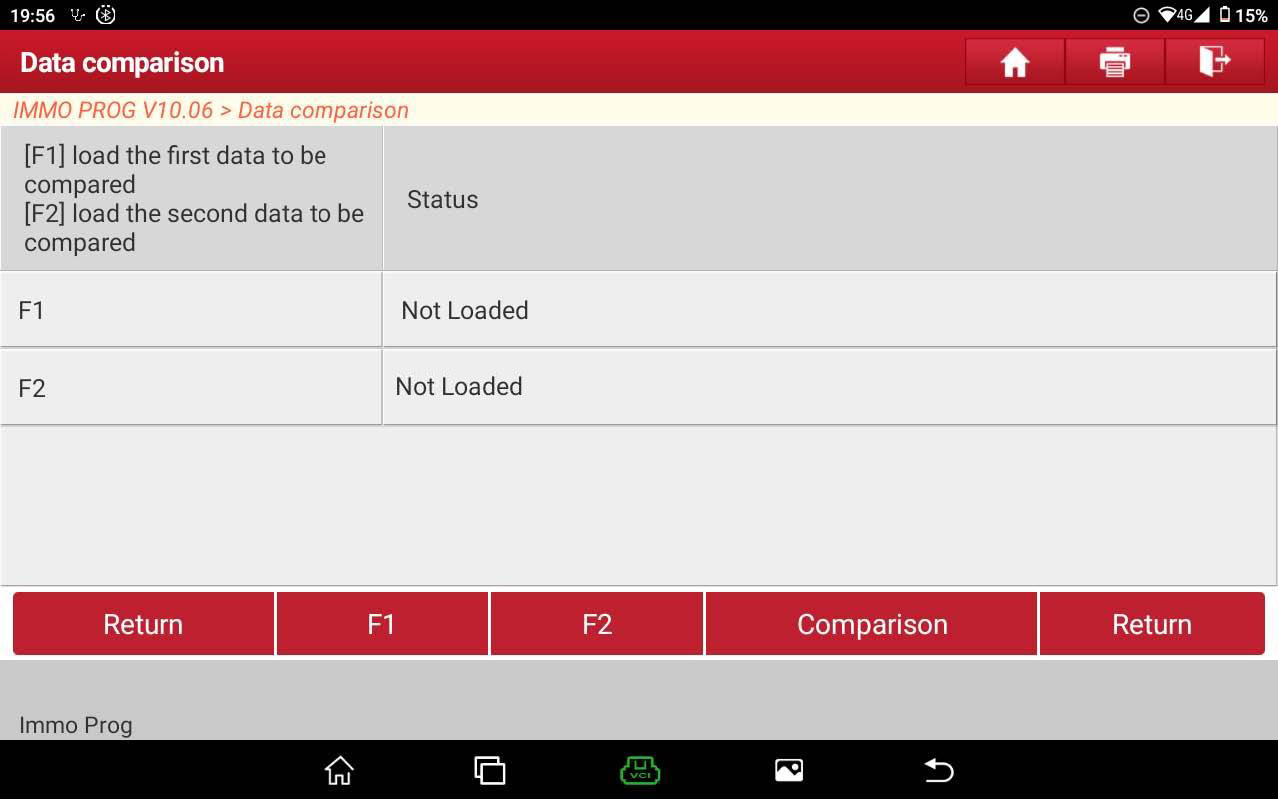
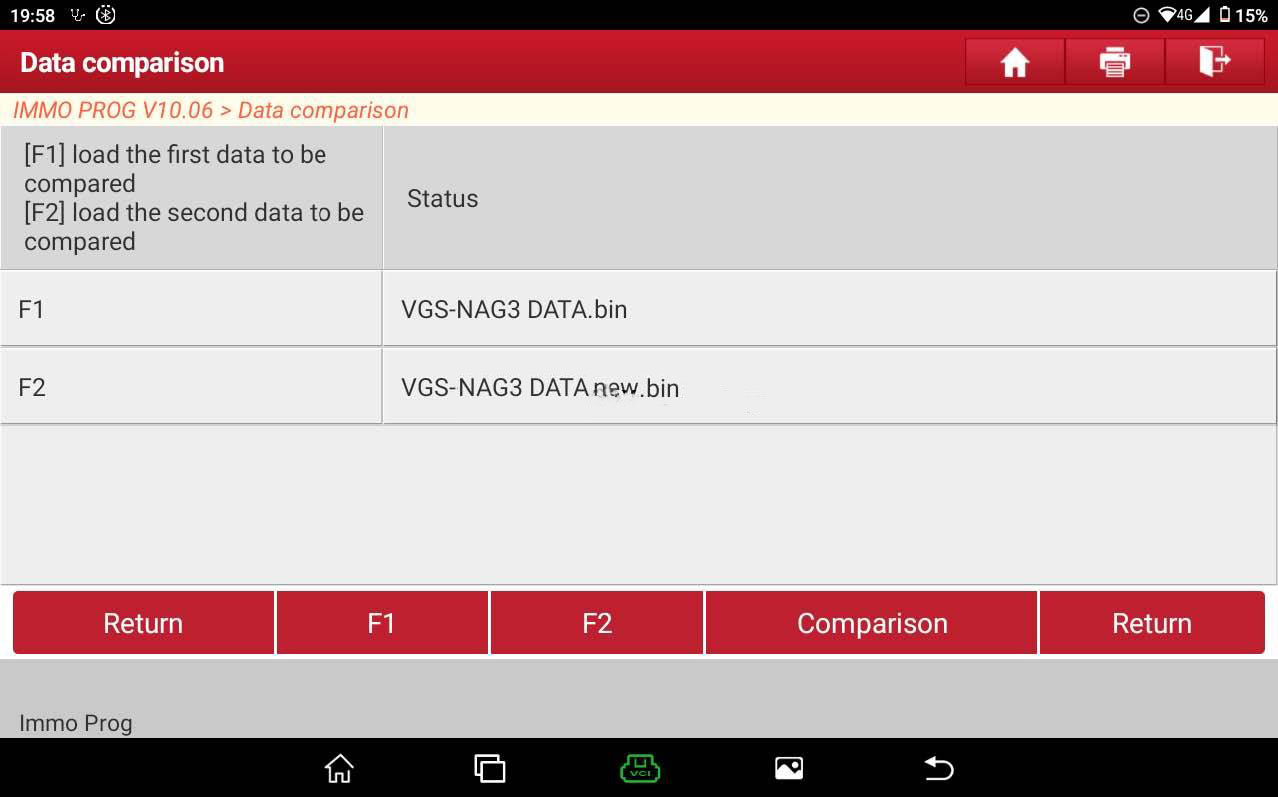
12.Click 【Data Comparison】and enter the data comparison interface.
13.Click 【F1】,【F2】to respectively import the data of original gearbox saved in step 7 and the data of external gearbox saved in step 11.
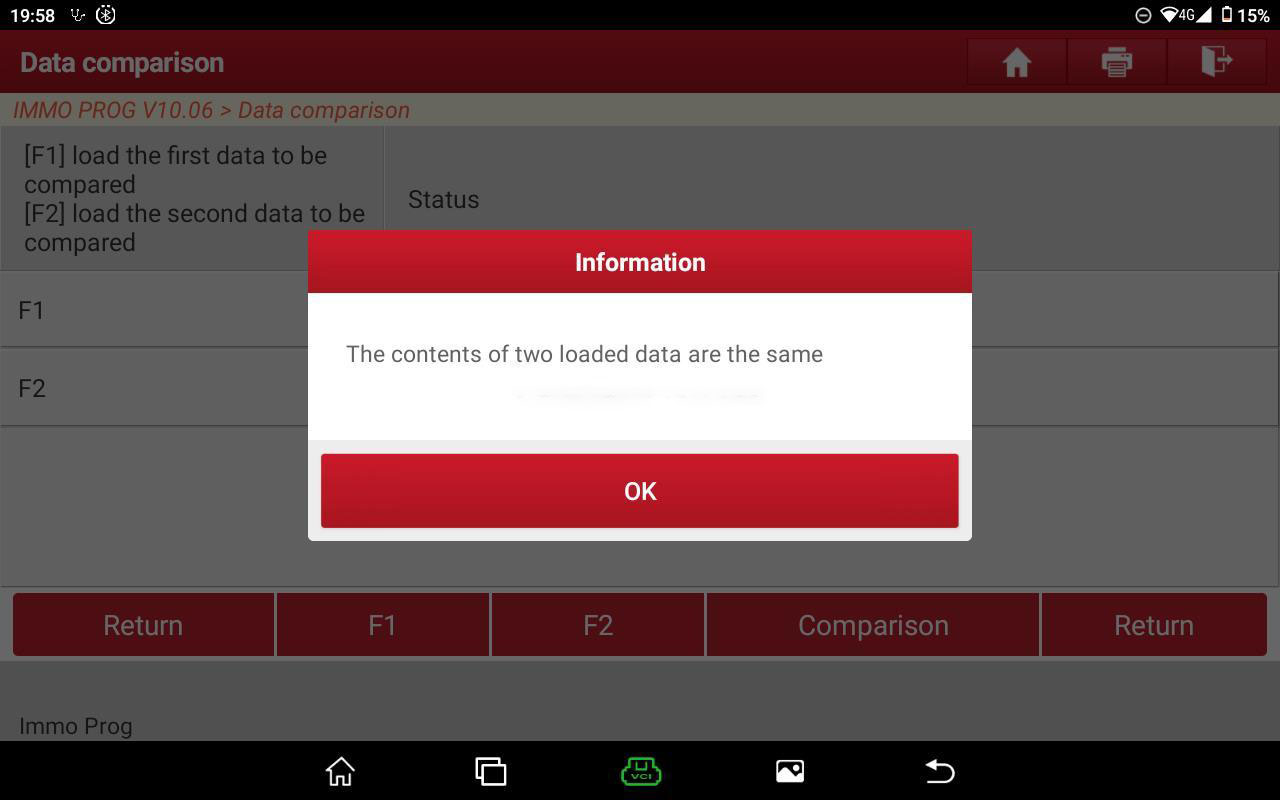
14.Click 【Comparison】, as shown in Figure 20, and finally install the external gearbox on the vehicle.
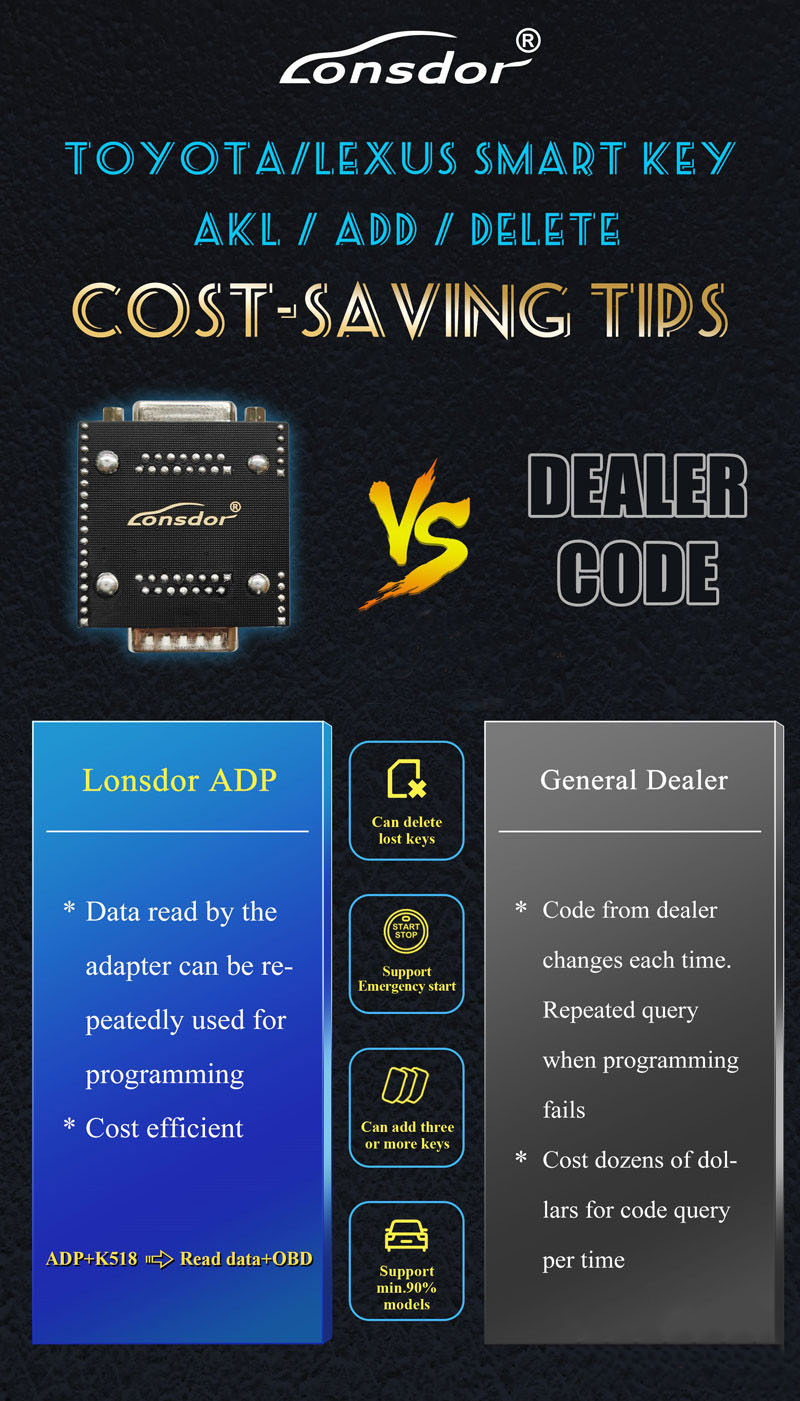
Lonsdor ADP Adaper is a new version from the Lonsdor Company that works with the Londor K518 key programmer. Support 90% Toyota Lexus (up to 2021) proximity smart key programming without PIN code. It supports Immodata backup, add keys via OBD, all lost keys (requires LKE emulator), delete keys, free password to program dealer key and Lonsdor FT specific key.
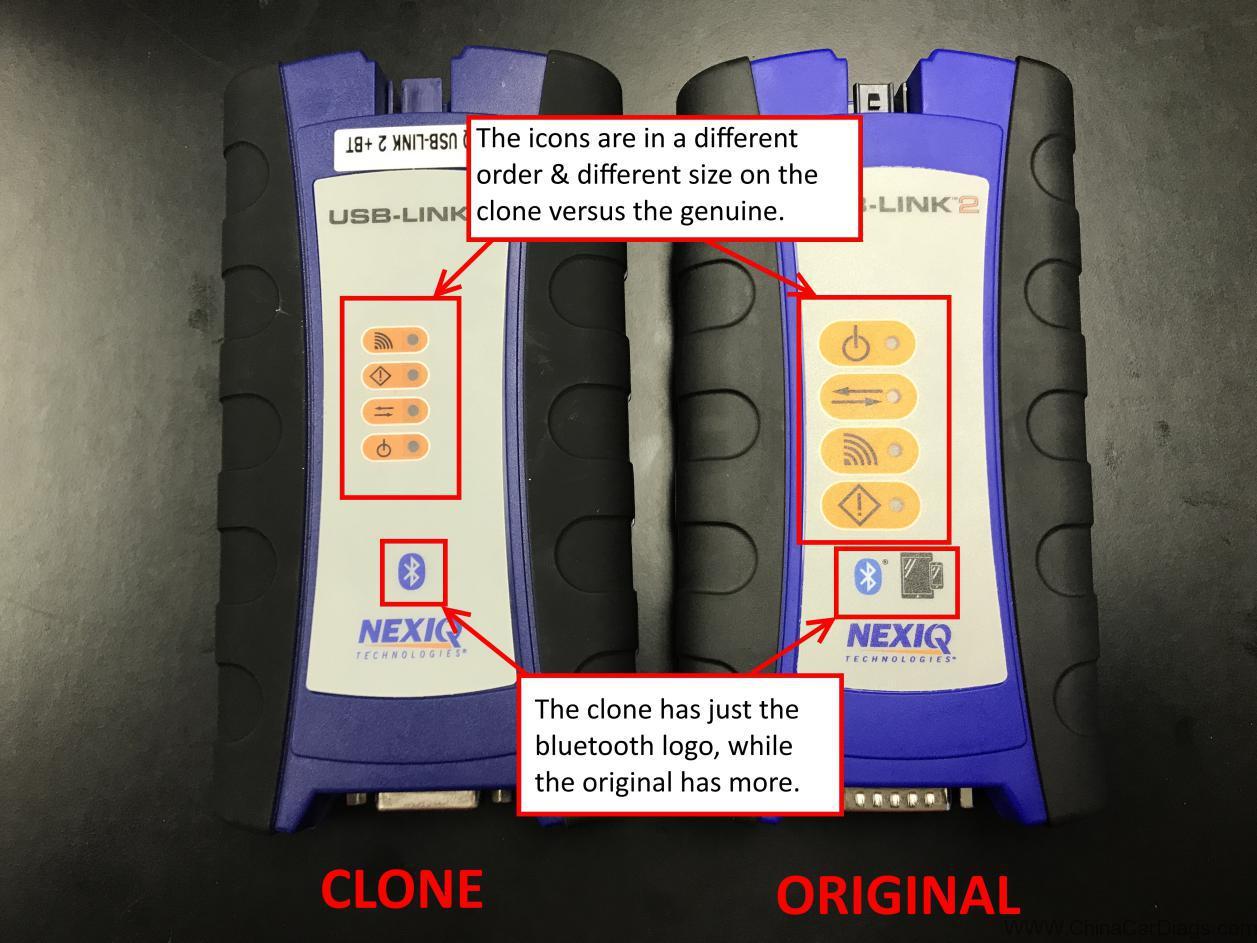
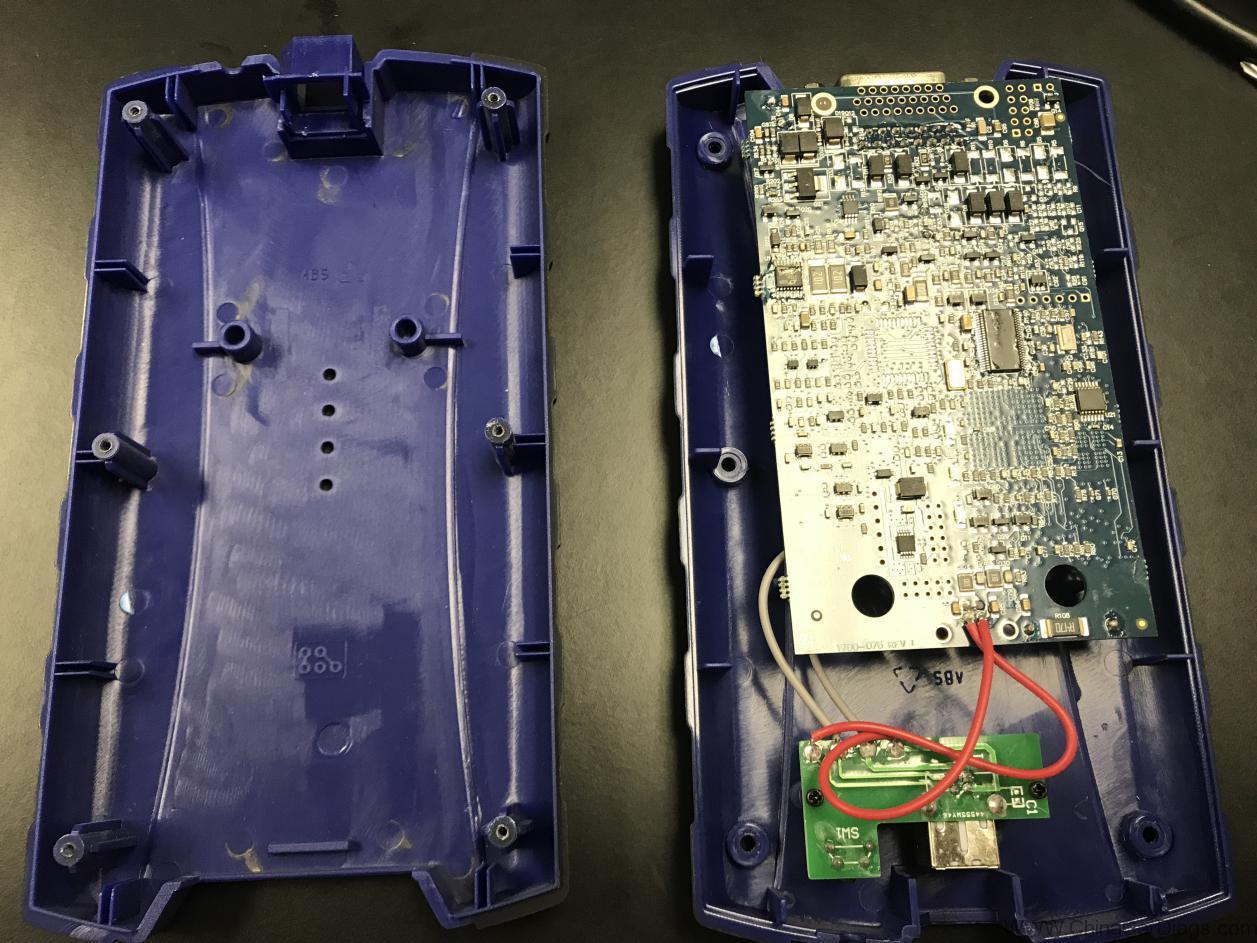
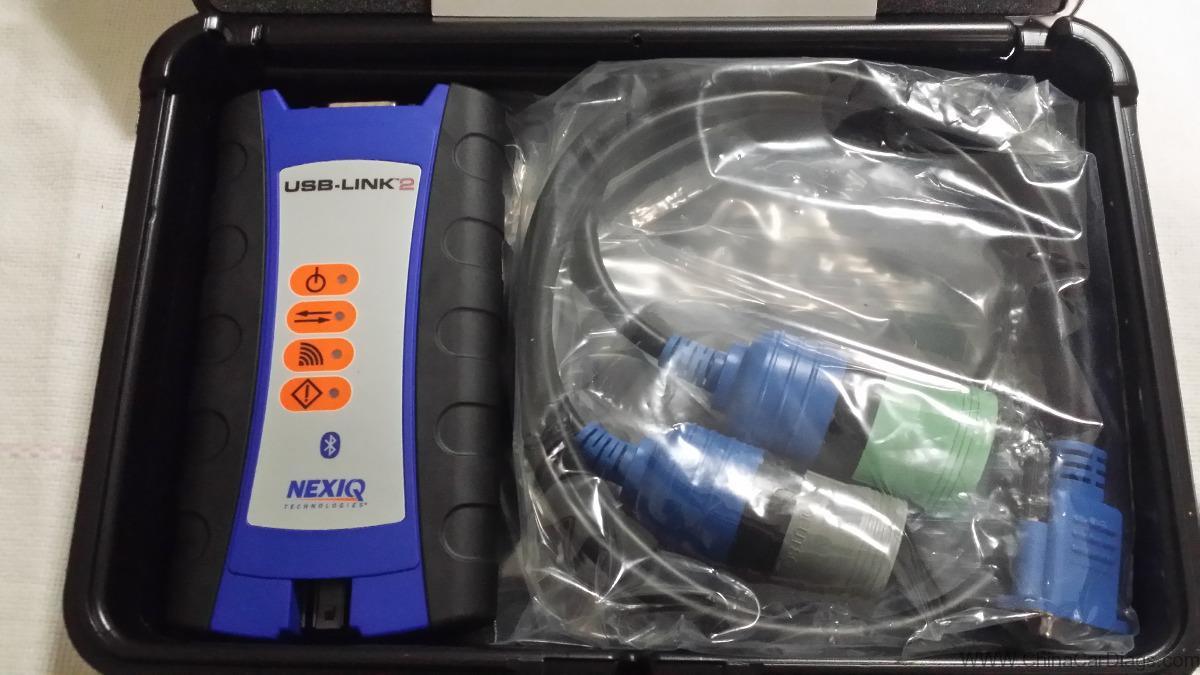
There are many Nexiq USB Link 2 for sale on the market, some genuine and some clone.
And for most of you, you may go to Nexiq USB Link 2 amazon and Nexiq USB Link 2 ebay as usual. But actually, it’s not a good option to have diagnostic tools there because you hardly ever get professional tech support of diagnosis after sale. Go to a site with experts there like http://www.Autonumen.com/
Nexiq USB Link 2 genuine vs clone:
Look here:
How to spot a China Nexiq USB Link 2 Clone
Nexiq USB Link 2 price:
The original should be 700 usd and even more. Definitely the original is the best option for trucks troubleshooting. But if you have a budget limit, try to have a good Nexiq USB Link 2 china clone at a decent price: usually less than 200 usd
Nexiq USB Link 2 bluetooth setup:
Get tech support after sale via Autonumen.com
Note that Nexiq USB Link 2 wifi is not available for the clone.
For the different between Nexiq USB Link 2 bluetooth and Nexiq USB Link 2 wifi, look here:
Nexiq USB Link 2 troubleshooting:
Class 1 Bluetooth provides up to 100 feet of wireless freedom
Flexible configuration supports wired or wireless connectivity
Compatible with applications that diagnose engines, transmissions, ABS, instrument panels and more
Reduce reprogramming times with direct USB connection
Mixed fleet capabilities with broad protocol support
Quick access to vehicle data for maintenance or management reports
Quickly attaches to vehicle’s diagnostic connector
No messy cables to untangle or get in the way with Bluetooth
Easy portability increases flexibility
May be used with desktop PC or laptop
Nexiq USB Link 2 compatible application:
Detroit Diesel Diagnostic Link
CAT Electronic Technician (On-Highway only)
Cummins Insite
International – ServiceMAXX Fleet Pro
Hino eXplorer
Volvo PTT (Premium Tech Tool)
VCAD Elite Mack/Volvo
V-MAC Service Tools
Allison DOC® For PC-Service Tool – Protocols Supported: J1939, J1708/J1587, and J1850
Allison DOC® For Fleets (1000/2000) – Protocols Supported: J1939, J1850
Allison DOC® For Fleets (3000/4000) – Protocols Supported: J1939, J1708/J1587
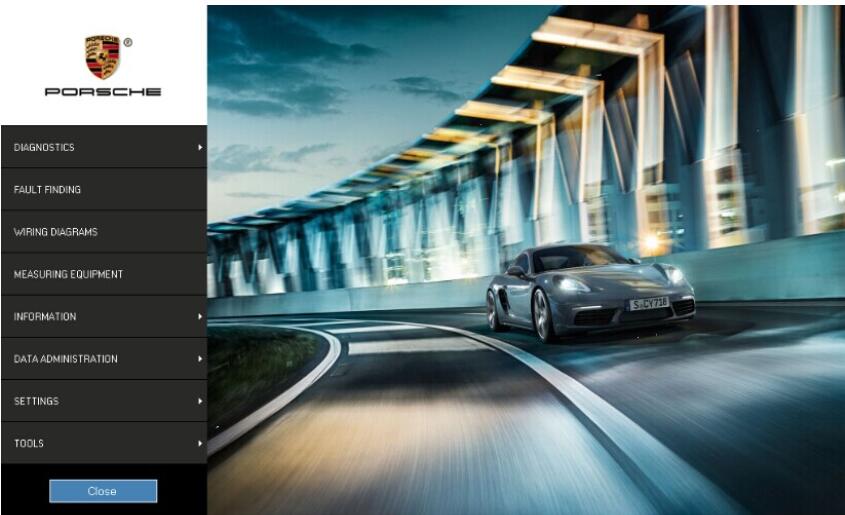
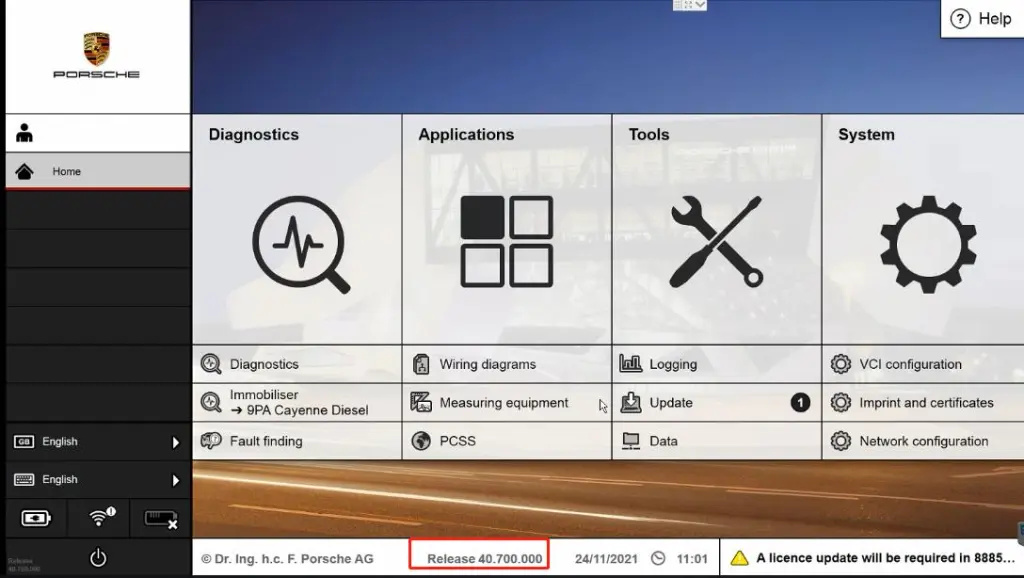
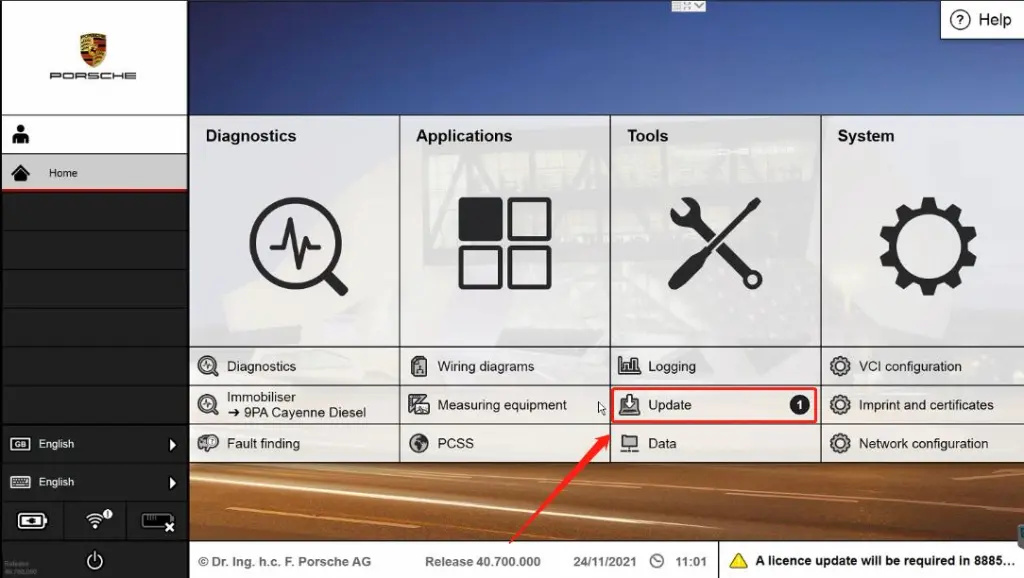
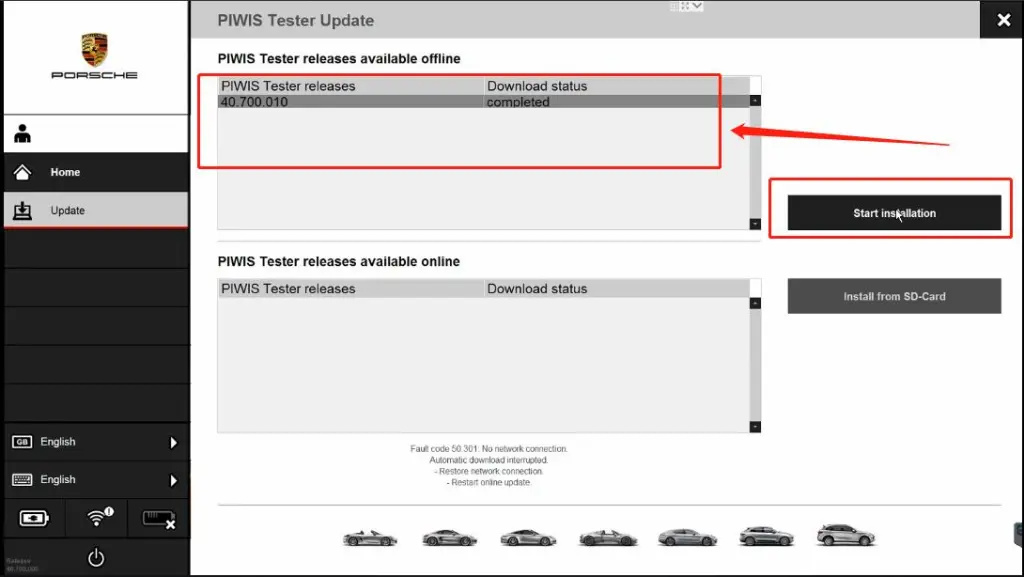
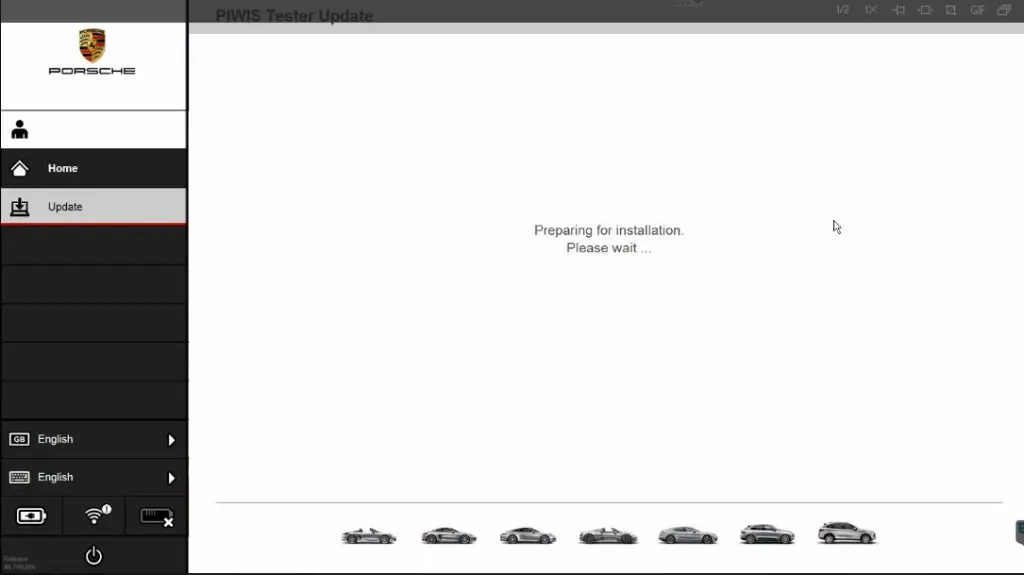
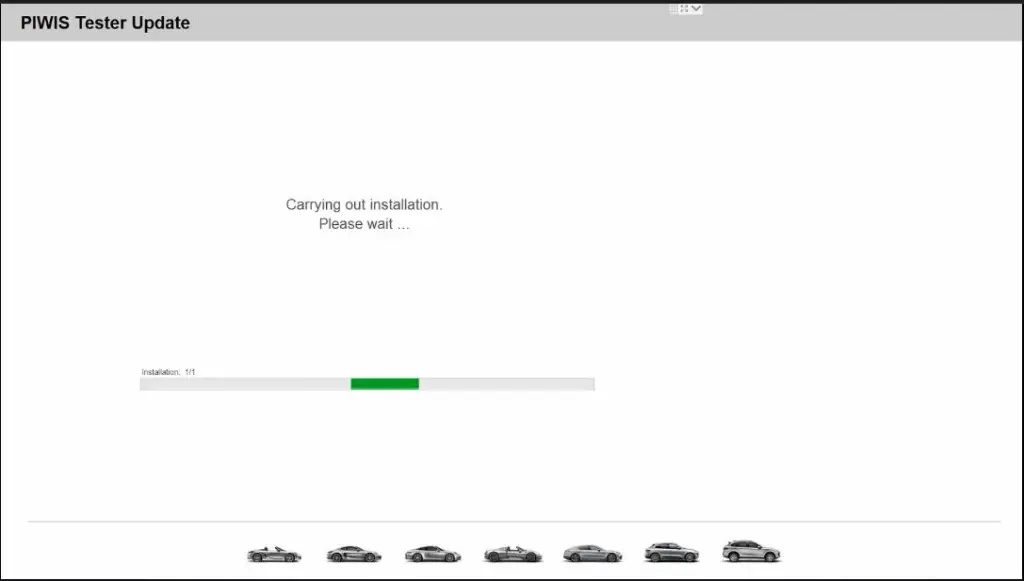
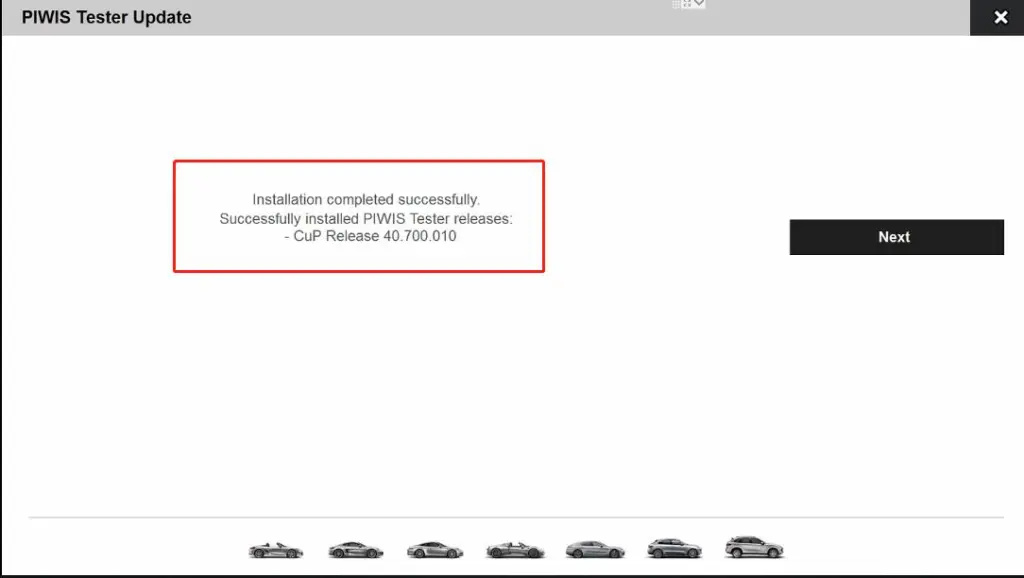
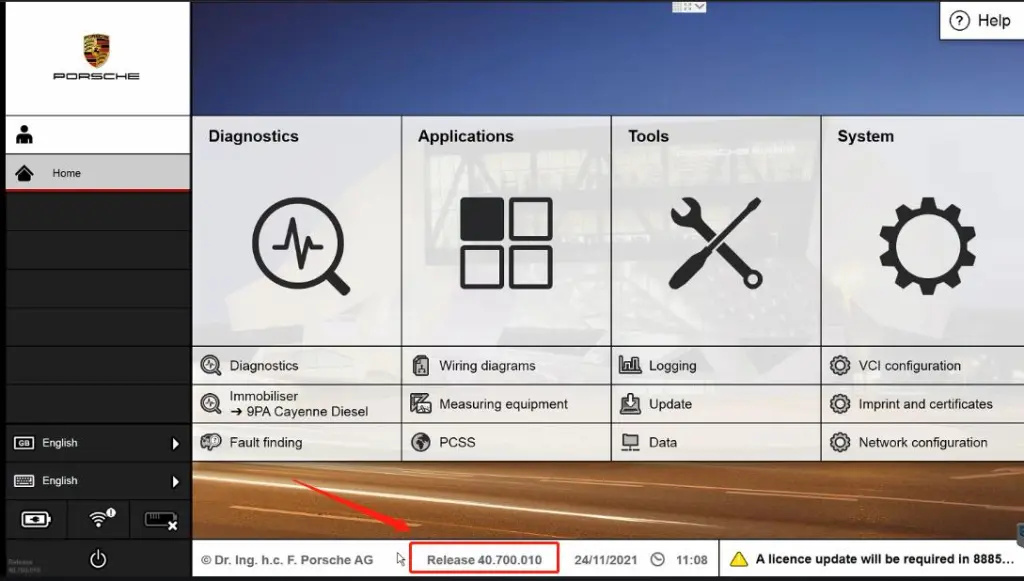
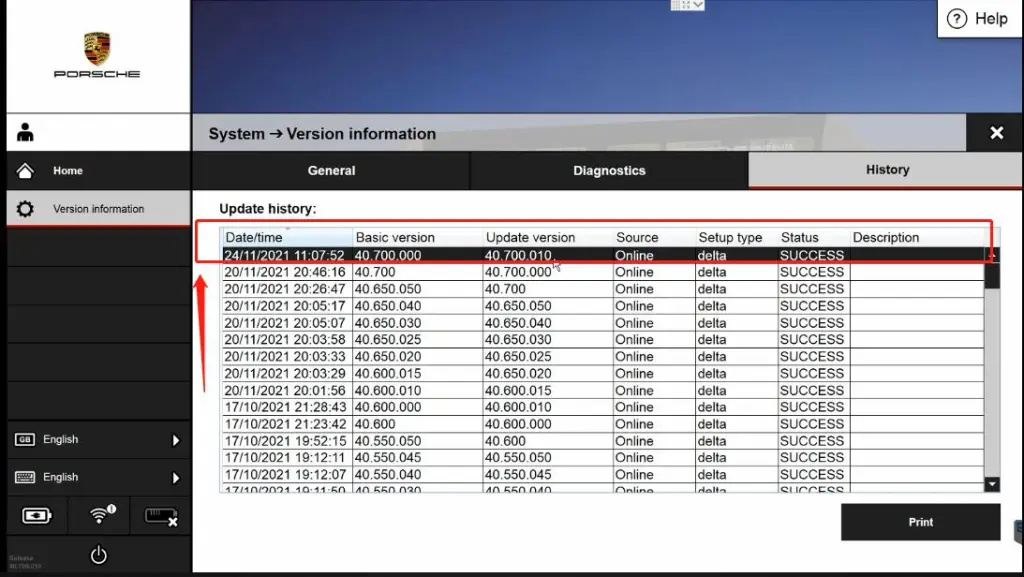
What is Porsche PIWIS II ? Porsche Piwis II software is the latest professional diagnostic software for Porshe,the most poweful diagnose and offline programming software for Porsche.
Porsche PIWIS 2 Functions and Features: 1Read/clear error code, catch data stream, computer programming match, component test, maintenance information consult, components site drawing, wiring diagram. 2Piwis Tester II works with the old and latest Porsche cars. It is equipped with the Panasonic laptop and original software for the test. Porsche Piwis Tester II can help you diagnose and program the most new and old kind of Porsche cars. For example: 911(997)(991), Boxster/Cayman, (987), Cayenne up to MY 2010, Cayenne from MY 2011 and Panamera. 3New Panamera can only be diagnosed by using Piwis Tester II. Based on current project planning, all earlier vehicle models will gradually be changed over to the new Piwis Tester II by the end of 2010. Piwis Tester I must be used for older models in the Porsche workshop until end of 2010.
This post show a guide on how to install Porsche PIWIS 18.100 universal image on your laptop.
Getaibose made some modifications: * Win XP tweaks (enable right click on taskbar, enabled win xp start menu etc) * Win XP activated (no more 3 days left to activate errors) * Uninstalled all Panasonic drivers and other drivers not critical to the system * Deleted un-necessary files * Windows XP fully updated from Windows Update * Uninstalled POSES and PET (to make download smaller, can re-install them if you wish – refer folder “Hardlock fix for installing PET and POSES”) * changed adobe reader from German to English * Updated WinRAR * 100% defragmented image * Made into universal image (can restore to VM or any laptop compatible with Windows XP) * Restored Size ~ 17.9 GB (this is excluding pagefile storage)
Porsche PIWIS II Universal Image Installation:
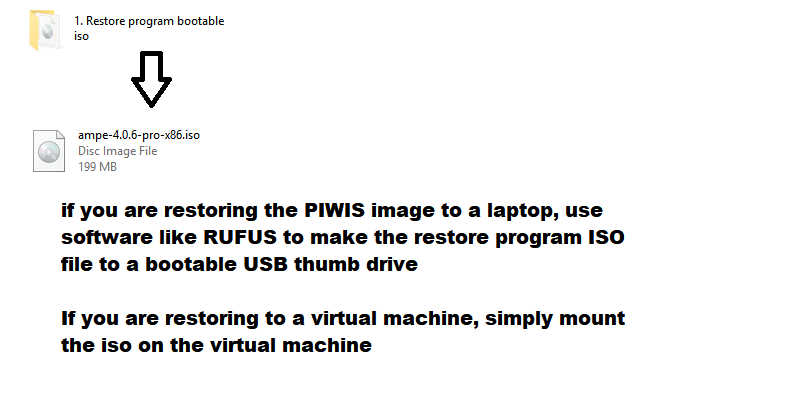
If you are restoring the PIWIS image to a laptop,use software like RUFUS to make the restore program ISO file to a bootable USB thumb drive.
If you are restoring to a virtual machine,simply mount the iso on the virtual machine.
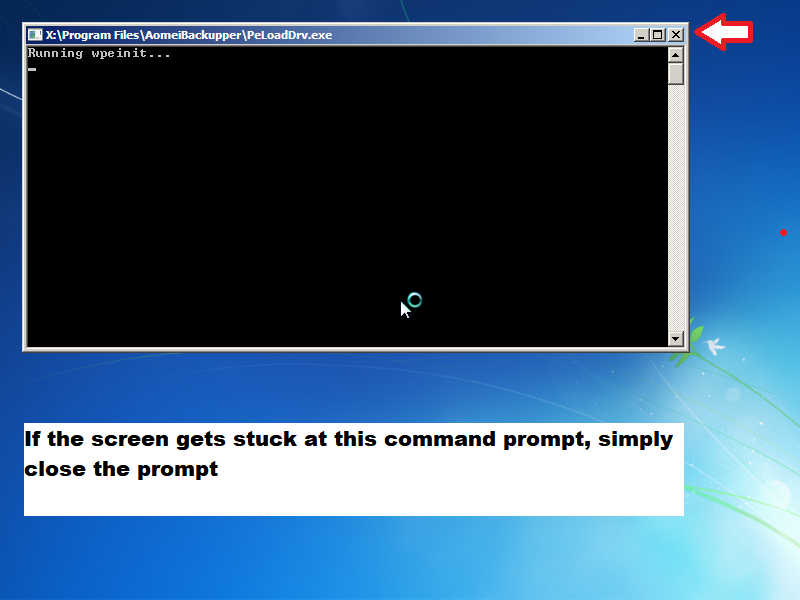
If the screen gets stuck at this command prompt,simply close the prompt
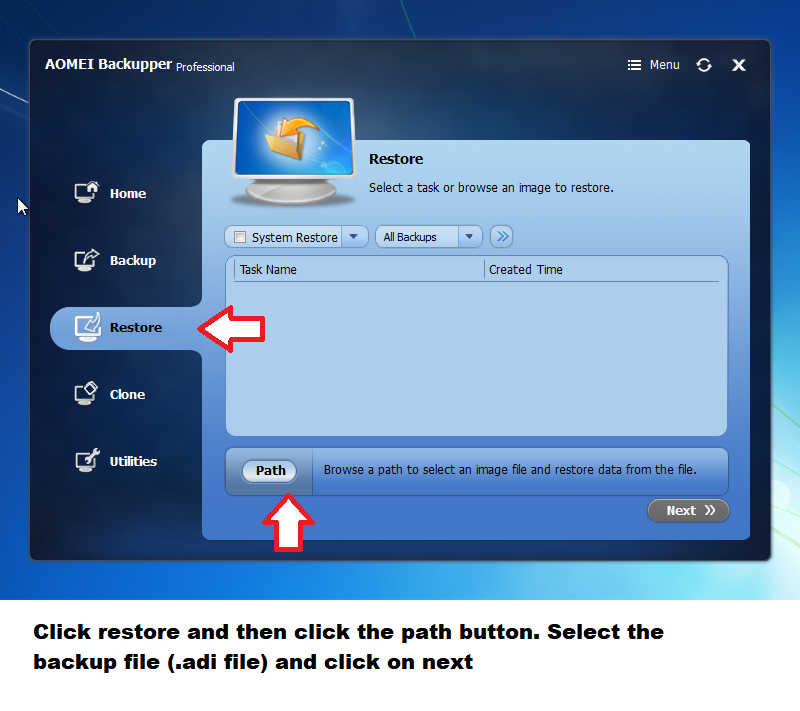
Click restore and then click the path button.Select the backup file(adi.file) and click on next.
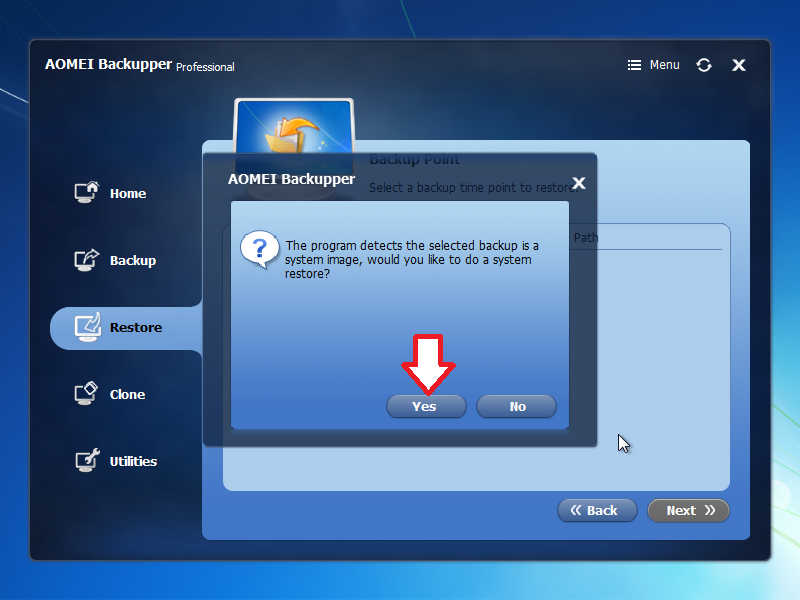
The program detects the selected backup is a system image,would you like to do a system restore?
Click “Yes”
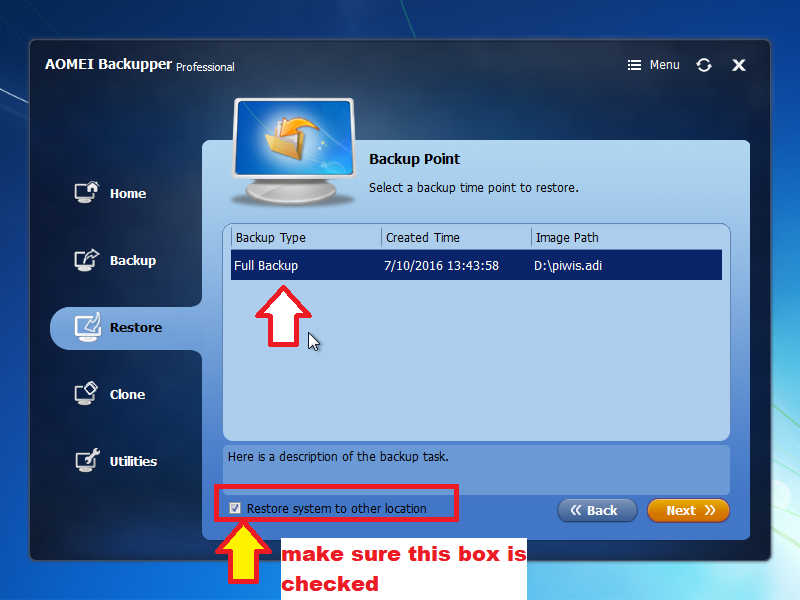
Make sure this box is checked
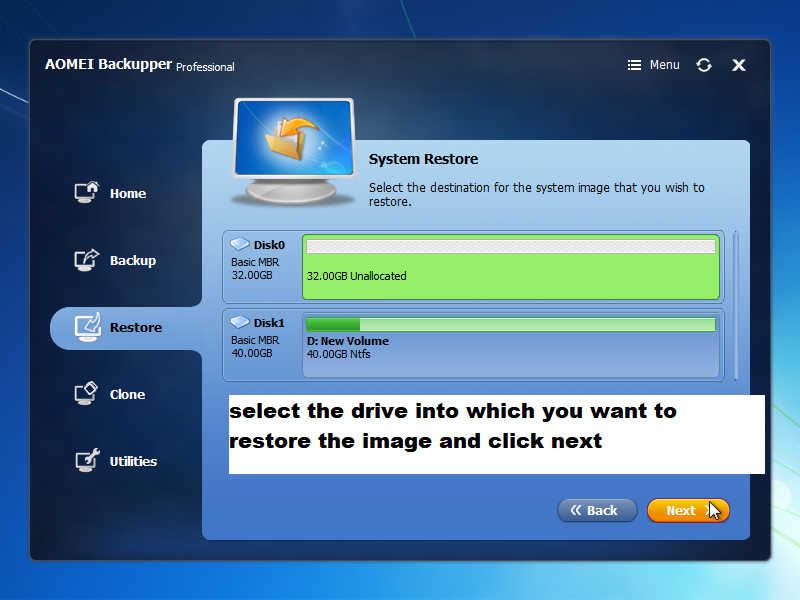
Select the drive into which you want to restore the image and click next
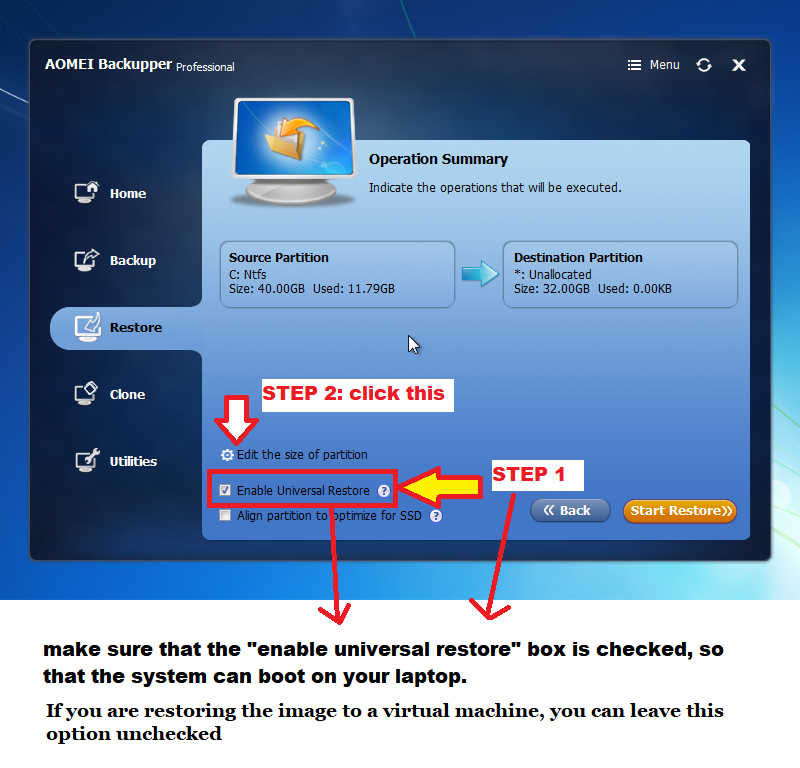
Make sure that the “enable universal restore” box is checked,so that the system can boot on your laptop.
If you are restoring the image to a virtual machine,you can leave this option unchecked.
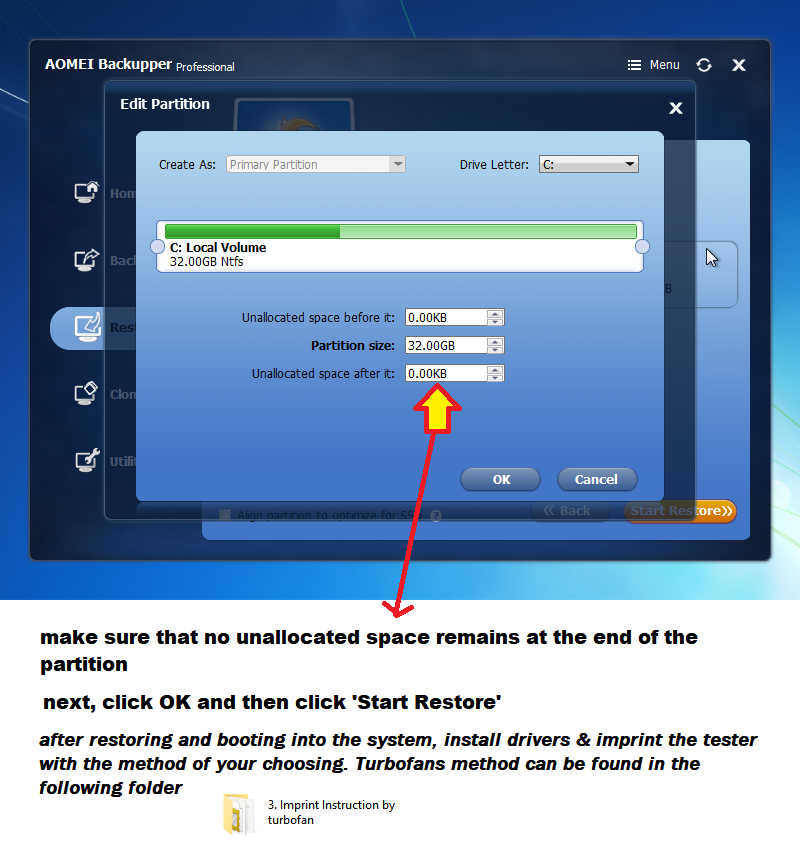
Make sure that on unallocated space remains at the end of the partition
Next,click “OK” and then click “Start Restore”
After restoring and booting into the system,install drivers and imprint the texter with the method of your choosing.Turbofans method can be found in the following folder.
Restore Porsche PIWIS II Universal Image to VM: 1.Create two virtual hard drives – lets say – VHD-A and VHD-B;VHD-A will be the main VHD of your VM into which you are restoring the image. VHD-B is just a temporary VHD to hold the image file for restore 2. Copy the image file (.adi file) into VHD-B 3. Attach both VHD-A and VHD-B to the VM 4. In the VMs CD drive, mount the recovery disc iso 5. Start the VM and boot into the recovery CD 6. Follow the instructions given in the archive to restore the image 7. After image finish restoring, turn off the VM and detach VHD-B and unmount the recovery disc iso from the VM 8. Start the VM – after it finish initializing, install guest additions. 9. Done – you can delete VHD-B from your system
Theoretically this image should be able to restore and boot into any laptop which supports Windows XP (hopefully no BSOD on booting). Also you can restore it to a Virtual Machine
My aim with this image was to create an PIWIS image that anyone can restore and use without any difficulty. This image might be more suited to someone restoring it to a laptop other than a Panasonic CF-30 as I have removed all the Panasonic drivers. You can restore it to a CF-30, just need to reinstall / restore all the drivers
Easiest method to re-install drivers – In the laptop you are planning to restore the image -> If you are already running Win XP in that laptop, use software called “Double Driver” to backup all the drivers. After restoring the PIWIS image, restore the drivers – hardly take 5-10 min for complete driver restore and it’s all one-click operation.
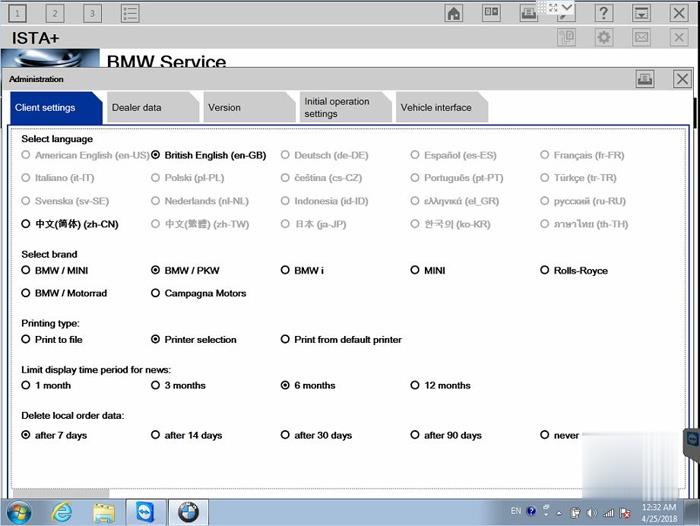
British English, German, Spanish, French, Italian, Polish, Portuguese, Turkish, Czech, Swedish, Dutch, Indian, Greek, Russian, Simplified Chinese, Traditional Chinese, Japanese, Korean and Thai
Steps to display ISTA-D language of your country…
Method 1:
Step 1: go to C:\Program Files (x86)\Rheingold\SQLiteDBs Step 2: remove the SQLiteDBs files in the folder to start the ISTA-D (Rheingold). Step 3: select the language of your country by clicking on the spanner mark . Step 4: close the ISTA-D (Rheingold) Step 5: Is the end of the deleted SQLiteDBs file back to the original
Method 2:
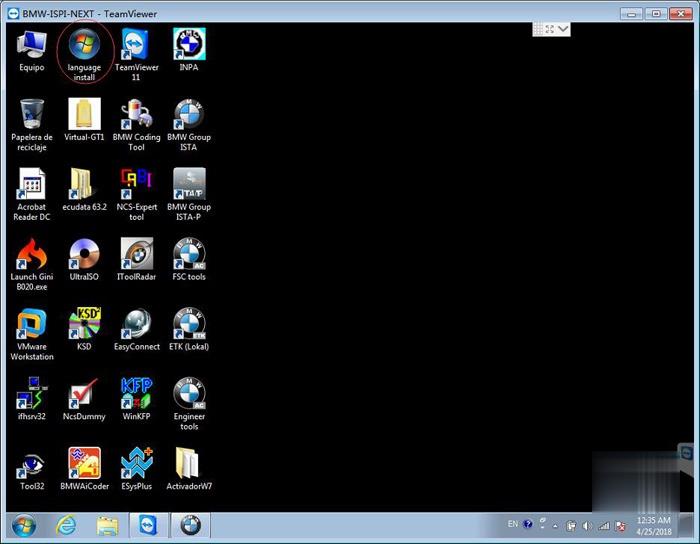
Step 1: Run ISTA-D software
Step 2: Then you will find that there are only English and Chinese language activated
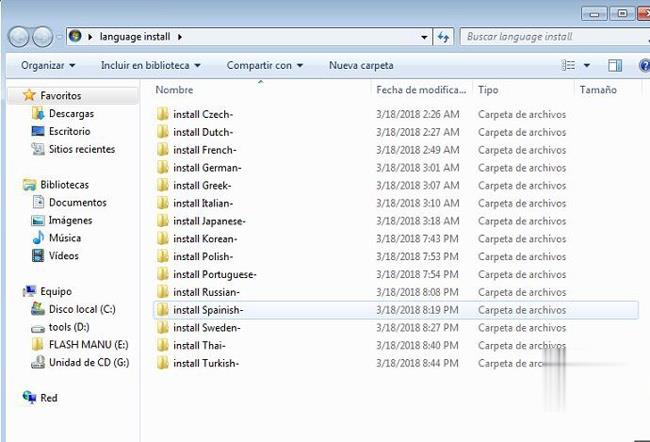
Step 3: Get the language installation fold from the desktop, check the photo below:
Step 4: Run”language install” application and choose any language file
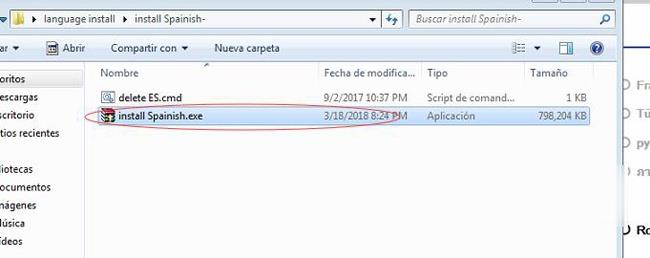
e.g. choose the Spanish language file to install
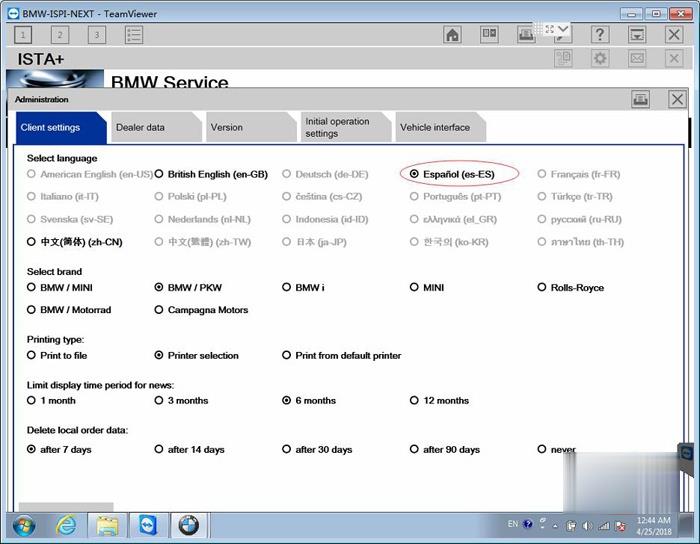
The Spanish language is installed
Then you have Spanish ISTA activated
Step 5: Save
Then you have the Spanish ISTA software for use
Done! ISTA-D language is changed!
Note: if you have ISTA from use and cannot change the ISTA-D language yourself, pls contact the support @ http://www.Autonumen.com/
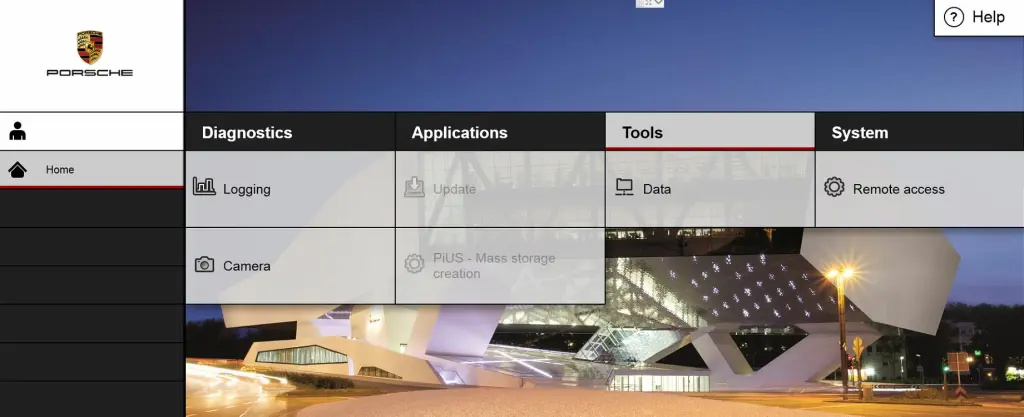
1.The computer is connected to the wired network or WIFI
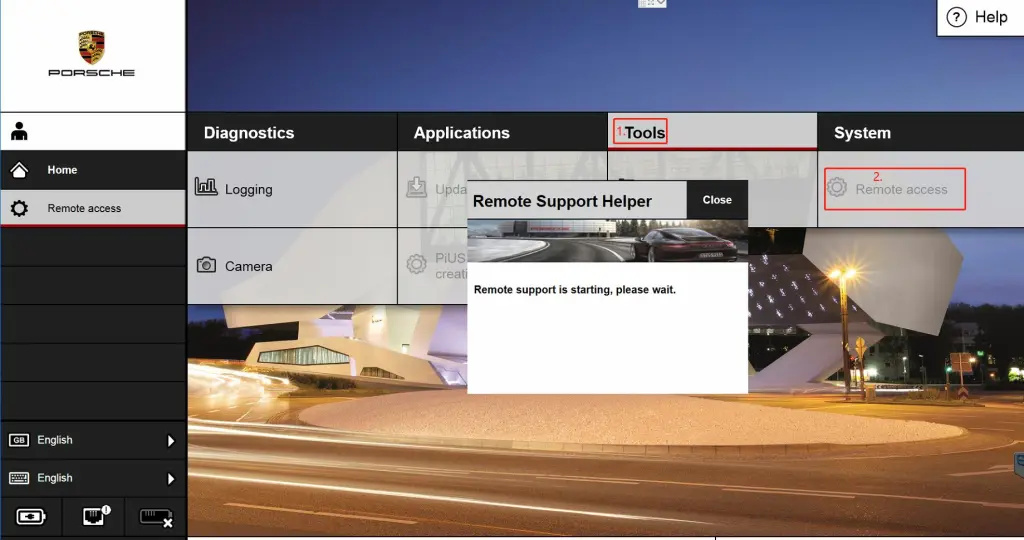
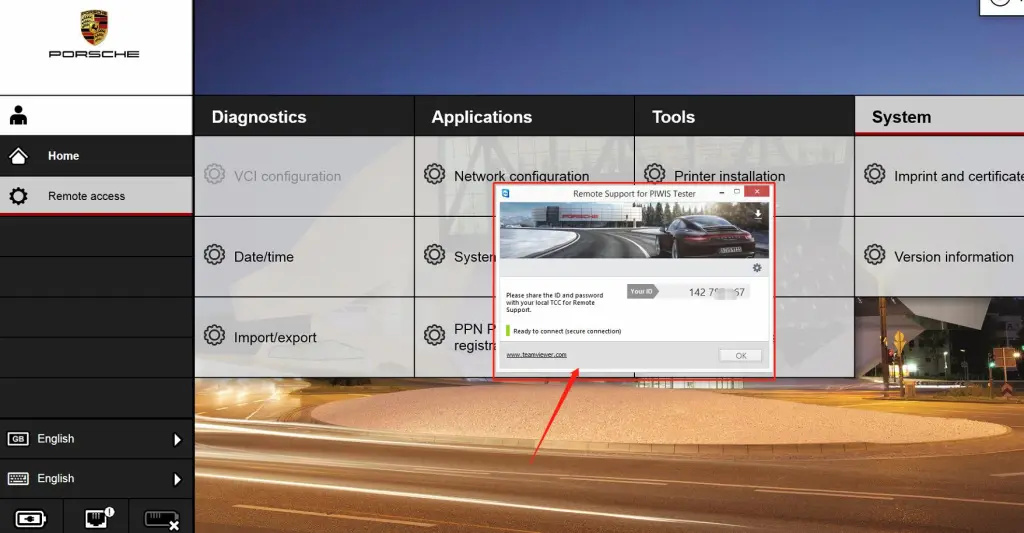
2.Home-Tools-Remote access
(Tips:If the window of the Teamviewer remote software does not appear, you can try to click Remote access again to open it again. If the window of the Teamviewer remote software still does not appear, you can try to apply the key combination, ALT+TAB to switch the window, and find the Teamviewer software.)
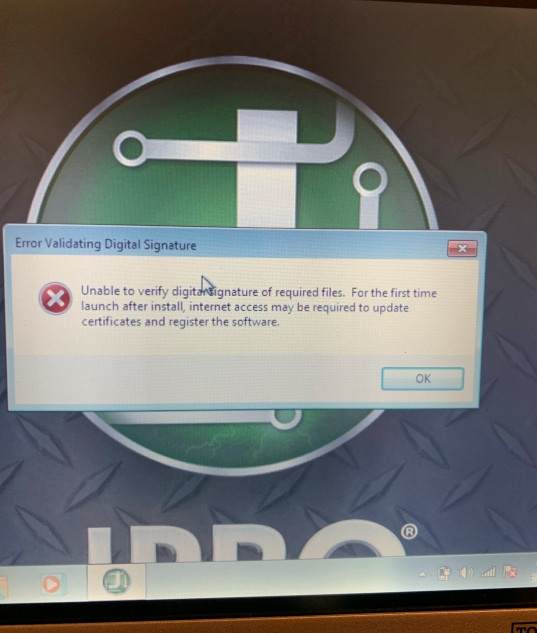
JPRO Truck Diagnostic Scan Tool for commercial vehicles famous on the market , but there have the part of customers have the issues “error validating digital signature” like bellowing : “I’m having issues launching the software, i get a “error validating digital signature” message. Can you please help me with this?”
“It reads the digital signature can not be verified ”
“hello, i have just received the purchase i made for you but the jpro commercial program asks me for a digital signature i need to know what i have to do to start using”
Issues display :
Lets check the solutions : 1.Need change the laptop system date to 2021.01-01 , and set it not updated the date automatically . 2.Send us the remote id and password , let our engineer help you active the software again , after active it , cant update the laptop date too Remote tool download links Todesk : https://dl.todesk.com/windows/ToDesk_Setup.exe Sunlogin: https://dl-cdn.oray.com/sunlogin/windows/SunloginClient_11.1.0.37237_X64.exe