When it comes to maintaining and diagnosing heavy-duty trucks, having the right tools is essential. Among these tools, a reliable truck scanner stands out as a must-have for fleet owners and mechanics alike. But what should you look for when selecting the best heavy-duty truck scanner? Here are some critical factors to consider.
Brand Reputation
Investing in a diagnostic tool from a reputable brand is always a wise choice. Brands like Ancel have established a solid reputation for producing high-quality diagnostic equipment that meets industry standards. A trusted brand often means better reliability, quality assurance, and a proven track record, which can significantly reduce the chances of encountering issues down the line.
Durability and Customer Support
Another crucial aspect to consider is the durability of the truck scanner. These devices are frequently subjected to harsh working conditions, including extreme temperatures, vibrations, and exposure to dust and moisture. Therefore, opting for a model designed with rugged features and durable materials is imperative for long-term use.
In addition to durability, customer support is a vital consideration. A scanner from a company that offers excellent customer service can make a significant difference. Whether you face technical issues or have questions about functionality, having access to immediate professional assistance can save you both time and frustration. Reputable companies typically provide multiple support channels, including phone, email, and live chat options. Furthermore, online resources such as user manuals, FAQs, and tutorial videos can enhance your overall product experience, making it more user-friendly.
Updates and Price
When selecting the best truck scanner, the frequency of software updates is another key factor. The automotive industry is continuously evolving, with new truck models and diagnostic requirements emerging regularly. A scanner that offers regular updates ensures it remains compatible with the latest vehicles and can diagnose newly identified issues effectively. This capability can save you from potential headaches in the future.
Price is, of course, an essential element in the selection process. The best truck scanner doesn't necessarily have to be the most expensive one. It’s about finding a balance between cost and the features provided. A slightly higher initial investment in a quality product can be beneficial in the long run, as it may prevent costly repair bills or unnecessary downtime due to inaccurate diagnostics.
In summary, the best heavy-duty truck scanner should come from a reputable brand, offer durability and excellent customer support, provide regular updates, and strike a balance between features and price. By considering these factors, you can make an informed decision and choose a scanner that meets your needs, ensuring your heavy-duty trucks remain in peak operating condition.
For 2024, several heavy-duty truck diagnostic tools stand out, each with its unique advantages based on brand support, features, and user needs. Here's an overview of some top choices:
John Deere Service Advisor EDL V3: Best for: Agriculture, construction, and forestry vehicles. Key advantages: Robust diagnostics for a wide range of John Deere equipment. The latest version (5.3.225) offers advanced ECU calibration, interactive tests, and multi-lingual support.
New Holland Electronic Service Tools (CNH EST 9.10): Best for: Users managing CASE, New Holland, and other CNH group brands. Key advantages: Comprehensive diagnostics including ECU programming, fault retrieval, and ECU configuration across multiple CNH brands.
Volvo Vocom 88890300 V2.8: Best for: Volvo, Mack, Renault, and UD trucks. Key advantages: Full support for Volvo and Mack trucks with advanced diagnostics, calibrations, and program functionalities, ideal for fleets with multiple brands.
JPRO Professional Heavy Truck Diagnostic Tool 2024: Best for: Mixed fleets (heavy and medium-duty trucks). Key advantages: Broad coverage including Mack, Volvo, Cummins, Detroit Diesel, and PACCAR. JPRO provides bi-directional control, DPF regens, and ECU programming, making it highly versatile.
NEXIQ-2 USB Link: Best for: Mixed fleets. Key advantages: Supports various OEM diagnostic software for engines, transmissions, and ABS systems, making it highly compatible across different brands.
CAT Caterpillar ET 2024A: Best for: Caterpillar engines and machinery. Key advantages: Advanced diagnostics, programming, and fault retrieval for Caterpillar equipment. Ideal for technicians working with CAT engines and electronic systems.
Jaltest Diagnostic Truck Set: Best for: Multi-brand fleets. Key advantages: Comprehensive diagnostic support across trucks, buses, trailers, and agricultural machine
ry with advanced calibration and reset features.
Conclusion: For Mack trucks specifically, the Volvo Vocom II and JPRO Professional are highly recommended for their dedicated support for Mack systems. The JPRO tool, in particular, offers extensive coverage across multiple brands, including Mack, and its bi-directional controls and parameter changes make it an excellent choice for versatile diagnostics.
For agriculture or mixed fleet operations, tools like the John Deere Service Advisor and CNH EST 9.10 will be better suited due to their focused support for those vehicle types.
The new holland est software (CNH EST) v9.10 is an advanced diagnostic software designed specifically for New Holland dealer technicians. This powerful tool enables seamless communication with vehicles equipped with a Controller Area Network (CAN) BUS, facilitating efficient troubleshooting and maintenance processes.
Compatibility and System Requirements
The latest version of CNH EST is compatible with Windows 10 (64-bit) and Windows 11 (64-bit PRO), ensuring that users can leverage the latest operating system features. However, it is essential to note that the Home edition of Windows 11 is not supported. To ensure optimal performance, the following minimum system specifications are recommended:
- Processor: Intel Core i5 6th generation or higher (Laptops must be manufactured within the last five years) - RAM: 8 GB or greater - Operating System: Windows 10 (64-bit) or Windows 11 (64-bit) - Hard Drive: 512 GB or greater (Solid State Drive (SSD) is recommended for improved performance) - Ports: - One 9-pin Serial port (preferred) or USB to RS-232 Converter (FTDI Chipset model 380003514) - Two USB ports - Ethernet port - WiFi 802.11b/g - Bluetooth - Mobile Wireless (recommended)
Features and Capabilities
CNH EST v9.10 offers a comprehensive suite of diagnostic features, allowing technicians to:
- Check the status of various parameters - Retrieve fault codes - Run diagnostic tests - Program Engine Control Units (ECUs) and parameters - Monitor active and logged diagnostics - View and modify ECU configurations - Access diagnostic procedures and schematics - Troubleshoot vehicle problems - Conduct scope diagnostics for deeper analysis
This engineering-level diagnostic software is invaluable for technicians working with a range of brands under the CNH umbrella, including:
- Case IH Agriculture - Case Construction - New Holland Agriculture - New Holland Construction - STEYR - Flexi Coil - Miller
It is important to mention that as of version 9.9, Kobelco support was discontinued, but users can opt for version 9.8 if required.
Optional Add-Ons
For those seeking enhanced diagnostic capabilities, the eTimGo for CNH EST offers a comprehensive offline repair and diagnostics database, complete with PIN search support. The latest version, eTimGo 8.18, is available for all brands, with a substantial size of 250 GB, and is offered in English.
Important Notices
Users should ensure their systems meet the minimum requirements for CNH EST v9.10. If a user's laptop does not meet these specifications, version 9.4 is available as an alternative with lower hardware demands. Additionally, it is critical to be aware of the support timelines; for instance, EST 9.3.0.0 will timeout on July 31, 2021, and support for Windows 7 and 8.x has been discontinued.
The New Holland Electronic Service Tool (CNH EST v9.10) is an essential resource for technicians in the field, providing the necessary tools to efficiently diagnose and resolve issues in a wide range of agricultural and construction machinery. With its robust features and compatibility with modern operating systems, CNH EST v9.10 is poised to enhance the service capabilities of New Holland dealerships worldwide. Whether through advanced diagnostics or optional offline databases, this software stands as a testament to New Holland's commitment to quality and efficiency in vehicle service and maintenance.
ALLDATA, the leading provider of diagnostic and repair information for automotive service professionals, now offers a new way to access repair information.
ALLDATAis the leading provider of diagnostic and repair information to the professional automotive repair industry.
ALLDATA is the leading computer-based diagnostic, repair and estimating information system, it can help you boost shop performance and build customer loyalty as you efficiently repair more makes and reduce comebacks.
Mitchell On Demand 5, the automotive aftermarket’s most comprehensive repair coverage for domestic and import vehicles, now offers an impressive multi-user capability for computer networks.
In addition, users can now choose to purchase coverage for domestic or import repair information on OnDemand5’s professional interface. Version Mitchell On Demand 5 also offers an improved search with advanced functionality that maximizes search results.
“With each new version of OnDemand 5, repair shops get the most updated industry information available anywhere,” said David Niemiec, vice president of marketing for Mitchell 1. “When shops are equipped with the very best, they function more efficiently and improve profitability.”
Overall,
Mitchell On Demand 5 Repair and Estimator offer the industry’s most comprehensive repair coverage and parts and labor database. OnDemand5 Version 5.8 Repair includes repair information for 1983 to current year domestic and import cars, light trucks and vans. OnDemand5 Version 5.8 Estimator gives accurate labor times for 1974 to current year domestic and import vehicle models.
Powerful yet simple to navigate, the Mitchell On Demand 5 Version 5.8 products also deliver a sophisticated search capability with a simple and intuitive layout.
Key features for OnDemand5 Version 5.8 Repair and Estimator include:
Categories within Repair and Estimator are streamlined to allow users to navigate between Repair and Estimator without reselecting the category
A parts and labor search that finds matching parts and labor information
Listings for new fluid capacities
An estimating quotes screen view that is completely flexible and customizable
The ability to save estimates
Single click access to TSBs and maintenance schedules
NAPA part numbers and prices included at no extra charge. A free NAPA parts catalog is included with OnDemand version 5.8 Estimator.
Additional product features and benefits include:
Single Vehicle Selection. Choose one year, make and model to access repair, estimating, or maintenance data that applies to a particular vehicle configuration.
Mitchell On Demand 5 TSBs/Recalls/Tech Tips. Helpful tools that allow users to find shortcuts and diagnostic aides for the most difficult problems.
Mitchell On Demand 5 Repair Articles, Specifications, Illustrations. Clear repair procedures, including diagnostics, enhanced by useful graphics and specifications.
Mitchell On Demand 5 Wiring Diagrams. System diagrams can be printed, usually on one page, and brought to the vehicle to speed diagnosis. A consistent format includes connector, ground and component locations.
Mitchell On Demand 5 Electrical Component Locators. Locators help technicians find important electrical components.
Mitchell On Demand 5 ScanLink Interface. A powerful diagnostic tool that helps interpret and display Snap-on scan tool data.
Mitchell On Demand 5 Quick Access. Frequently used data, such as technical service bulletins and scheduled maintenance services, is readily available.
Search Wizard. Finding key words and phrases is easier using a familiar Internet-style search interface.
Article Recall. Recall repair look-ups or estimates with a single mouse click.
JCB Backhoe Loader 3CX steering column can be tilted to improve operator reach and comfort levels. This type of assembly is refered to as a ‘tilt column’. The illustration on the adjacent page is intended as a guide to removal and replacement.
Removal 1 Park the machine on firm level ground, engage the parking brake and set the transmission to neutral. Lower the loader arms to the ground. Switch OFF the engine, remove the starter key and disconnect the battery.
2 Remove the steering wheel as shown at A.
3 Remove socket screws B and take off the steering column pedestal cover. 4 Remove the control column switches C. 5 Remove the socket screw D securing the gas damper strut E. 6 Remove socket screws F and lift up the rubber protective cover behind the brake pedals to gain access to the flexible coupling. 7 Remove the coupling bolt G and shoulder bolts H. Then carefully withdraw the steering column assembly (with the gas damper strut attached) from the flexible coupling J.
Replacement Replacement is the reverse of the removal sequence. Apply JCB Threadlocker and Sealer to threads of nuts T. Note: The coupling bolt G must engage with the cut-out in the shaft. After re-fitting check that the steering tilt functions correctly,and that the direction indicators and lights operate correctly. Check that the wires from the brake pedal switch do not rub on the steering column. Torque Settings Item Nm kgf m lbf ft D 14 1.4 10.3 H 40 4.1 29.5
Dismantling and Assembly The illustration on the adjacent page is intended as a guide to dismantling and assembly. Dismantling 1 Using a screwdriver in the slot, carefully prise out the dust seal L from the outer column tube. 2 Remove external circlip M, washer N, tolerance ring P and withdraw the steering shaft from the outer column tube and pivot bracket. Note: The top and bottom bearings R and S housed in the outer column tube are non serviceable parts. They may be removed for cleaning and inspection, but if the bearing(s) have failed a new outer column tube and pivot bracket assembly must be used. Note: The gas damper strut E is a non serviceable part. If the damper is faulty it must be replaced with a new one.
Assembly Assembly is the reverse of the dismantling sequence.
More repair case for JCB,please refer to:JCB Trouble Repair
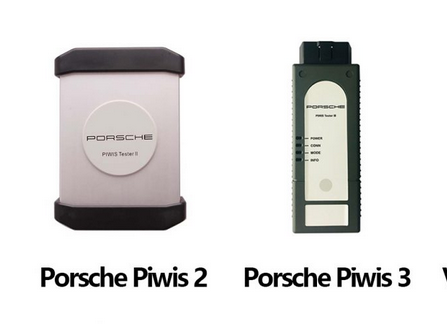
First of all, aPiwis II and a Piwis III do the same things, only the three can do newer cars, 2018 and on, where as the two is limited to the 2017 and earlier models. The III is easier to use but is more technically challenging to clone since it seeks a signal from Porsche to authorize the VCI (the thing you plug into the car’s diagnostic port) The Chinese who sell the clones, created their own server to clone and send out those signals, then modified the VCI firmware to look for the Chinese signal instead of the Porsche signal.
My background, I do not work for Porsche or have I ever used a dealer unit. What I learned, I learned from playing with the units. I had purchased a flooded 2013 Panamera, and I wound up changing ever module in the car except two. I purchased new and used modules, and used the PIWIS 2, then the three to code those modules to my VIN. As many people noted here, there are plenty of other devices that you can purchase to reset your service interval, change your battery or set the parking brake to the service position. What those devices can’t do that the PIWIS can do is code modules to your car, change the way those modules operate, run some diagnostic tests and see the output and input of almost every sensor and button in the car.
You purchased your tester, now what.
Some terms. VAL Vehicle Analysis LOG. When your tester first connects to the car, it reads the state of all modules and records all the faults in a log. This log is then tagged by you either as before repair, during repair or after. These logs serve as proof for Porsche that the dealer performed work for service payment. They don’t serve a lot of value for individuals, other than document all your errors for offline. I found them somewhat useful as a milestone as my car had over 150 faults when I began and I could see my progress looking through vals as I did repairs. VALS want to be uploaded so they look to Porsche servers to upload but since yours doesn’t have a PNN account, it can’t connect.
Programming or Coding. Porsche uses both but really doesn’t seem to distinguish between them. You cannot update the firmware of the modules, you simple program it to your car. You can add or change the VIN in the modules. For modules to work in yor car, they must have the VIN programmed in them. Buying a new module from Porsche and sticking it in, won’t work because the module needs a VIN programmed in it to talk to the other modules in the car. Beyond that, you need to program the module to your options. For example, the rear door module on a panamera uses the same module for the right and the left doors. If you place a new module in the right door, the window operates in reverse. Programming it, tells the module, it is located in a right door and reverses the up/down. . There is auto and manual programming, more on that in a another post.
Initial set up and overview When you first connect to your car, you must have the car on, but not running. Connect the VCI to the car and the laptop, turn on the car then start the diagnostic program on the laptop. The PIWIS III will auto determine the model of the car, the PIWIS II requires you to select the model when starting the diagnostic program. I will add pictures at times when asked. Keep in mind I sold my PIWIS II, so I can only add pictures of the three. if you are not connected to a car, both versions of the PIWIS will offer simulation mode which is a good way to get familiar with the unit without messing up your car.
When you first enter the diagnostic mode, you are shown a list of all modules in your car. In engineering mode, all modules are shown, even those not in your car so make sure you are in Production mode. If everything is in English you are in production mode. If the module names are in German, you are in engineering mode. Note there is a language selection prior to entering the diagnostic program for those who seek other languages. You are on the overview tab and there are other tabs, but on the module listing page, you do not want to enter any of those other tabs, They are used when looking at one module. The first thing I recommend people do is hit the button marked add. menu at the bottom.(F7) From here you can run read all fault memories. Run that and don’t run the other options as many require a connection and a Porsche account. Don’t get too concerned with your faults, many show up simply from a low voltage situation. Try erasing them all first. If they all disappear, that’s good, any that stay on will require investigation. Please note that some will disappear because the module is not active. If you run the car and then note the same faults reoccur, you should investigate them.
Once you have cleared all the faults, you should go back to the overview screen which shows all the modules and select any module you want to investigate then hit next. That will take you to that specific module where you can now use the other tabs across the top to show the module information, read any inputs or outputs and do any repairs that may be listed. To keep this initial post short, I will post specific how to’s in separate posts. I hope others will do the same.
Finally, there are certain modules that you cannot replace. These modules hold the key code information and must be programed by the dealer. They are the engine module, the Front and rear Body control modules, the Steering ELV module (few people have this module) I read somewhere that the airbag module is also on this list. I cannot confirm this as that is one of the only modules that is original in my car and still worked. While you cannot replace them, you can certainly do repairs, or change options in some of them. You can use them to diagnose problems, you just can’t replace them entirely.
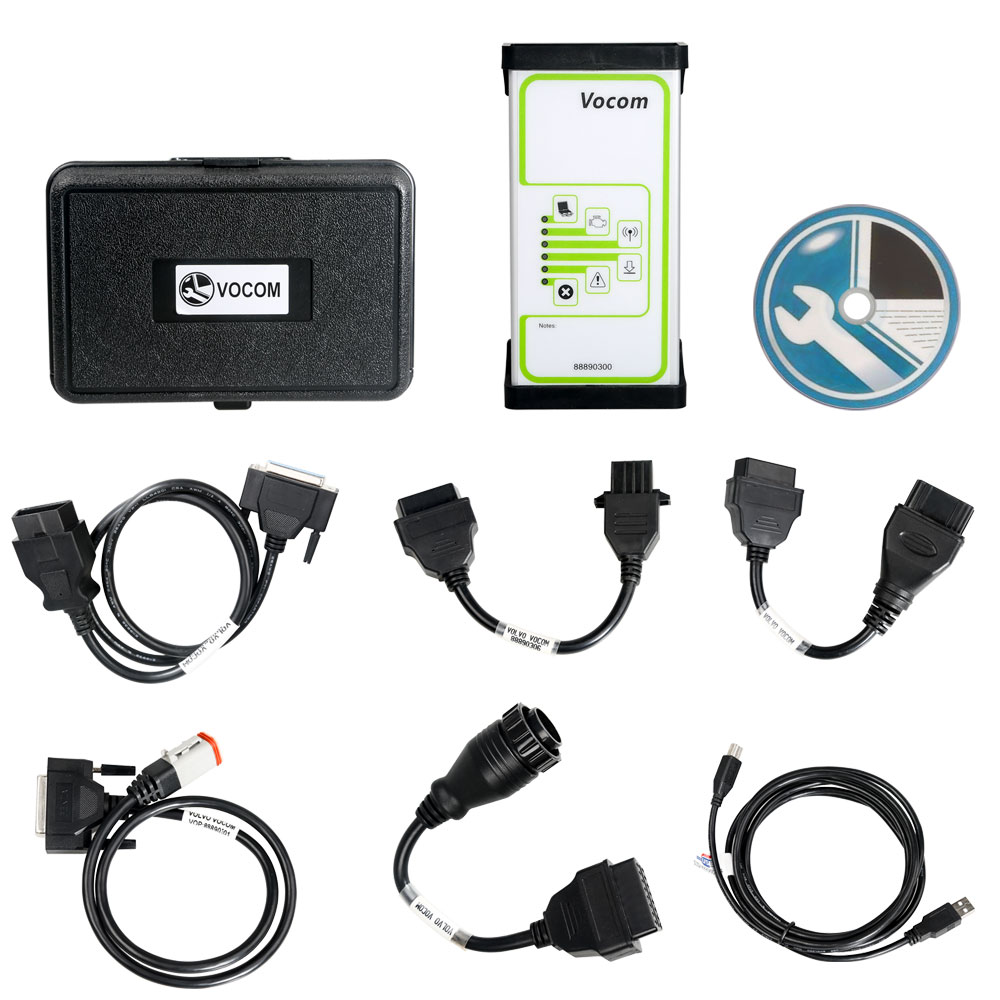
Volvo 88890300 Vocom is the best and professional volvo truck diagnostic tools by far, i have tested it on my vehicle without any problems. Volvo Vocom 88890300 is a diagnostics application that covers the whole repair process through the use of plug-ins. With Volvo 88890300 Vocom Interface you can diagnose, test, calibrate, and program a product. A product could be a vehicle, engine, or a machine. Volvo 88890300 Vocom Interface also provide functions for updating the tool, communication with the product, and other external applications. The set of plug-ins, user authorizations, and available languages is adjustable to provide every user with what they need.
Identify a product—works ! View information history—works ! Diagnose a selected product—works ! Test a selected product—works ! Program a selected product—works ! Calibrate a selected product—works !
1.Supports Volvo Renault UD Mack Truck Diagnose 2.Diagnostics application that covers the whole repair process through the use of plug-ins. 3.With Volvo 88890300 Vocom Interface you can diagnose, test, calibrate, and program a product. 4.Provide functions for updating the tool, communication with the product, and other external applications. 5.Adjustable plug-ins, user authorizations, and available languages meet needs for different users
Volvo 88890300 Vocom Interface Supported Companies and Electrical Systems
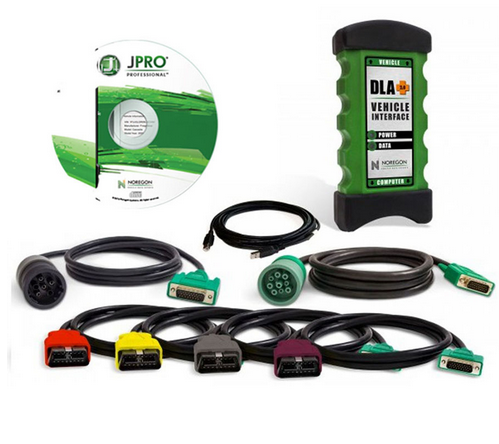
What does JPRO do? JPRO empowers diesel technicians to diagnose and repair all makes, models, and components. JPRO reduces a technician’s dependency on OEM software by offering industry-leading bi-directional controls, including DPF regens, cylinder cutouts, parameter changes, and much more. For detailed information and full coverage details, visit the JPRO Professional page.
What trucks will JPRO work on? For commercial vehicles, JPRO is an all makes, models, and components solutions. For detailed information, check out our coverage chart.
Can JPRO perform bi-directional vehicle tests? Yes! JPRO comes loaded with industry-leading bi-directional tests for the makes and models you commonly repair. For a full list of included tests, visit our coverage chart.
Can JPRO adjust user-configurable parameters such as road speeds or idle shutdown settings? Yes! On certain vehicles, users can adjust max cruise speed, max road speed, idle shutdown times, and enable/disable cruise control. Visit our coverage chart to see which vehicles currently allow parameter changes.
What OEM applications come with JPRO? Although installed OEM applications can be launched directly from JPRO, OEM applications are not included with your purchase. JPRO is intended to alleviate the need to use many different OEM applications by providing coverage for all makes, models, and components.
Can JPRO perform ECU programming? Due to security and safety concerns, JPRO does not allow users to reprogram ECUs.
If I have OEM software, why do I need JPRO? Diagnosing on a component-by-component basis is time consuming in an industry where time is extremely valuable. JPRO covers all components on the vehicle to provide users with holistic view of the vehicle to improve total vehicle health. JPRO automatically detects all components on the vehicle, down to the serial number, so you don’t have to choose which application is needed to diagnose the vehicle. If you do need additional information from your OEM applications, JPRO will launch the application and/or its associated troubleshooting manuals directly.
What adapters work with JPRO? JPRO requires the use of a Noregon adapter. This includes DLA+ 2.0, DLA+ 2.0 Wireless, Trailer Diagnostic Adapter, DLA+, DLA+ Wireless, DLA+ PLC adapters, and Allison Transmission USB Translator.
JCB Electronic Service Tool diagnostic interface is used for fast and effective fault finding, check maintenance standards, see if the machine has been abused, view and change machine set up data, flash ECUs with the correct data files. You can reset EMS hours, edit speed limiters and use other functions what require special unlock.
JCB Service Master is a gateway application allowing a large number of Vehicle Support Applications to be linked using one familiar interface. The interface acts as a graphical tool for selecting the target vehicle from a groups of Vehicle Families and triggering the particular Service Tool Application desired. This removes the need for a user to ‘remember’ every individual service tool available and select which one if intended for a particular machine.
Top 10 Best JCB Diagnostic Kit In 2022 | JCB Electronic Service Master Tool.
01. V21.2.6 for JCB Diagnostic Kit JCB Electronic Service Tool JCB Excavator Truck Diagnosis KIT+JCB service parts pro SPP Software
02. JCB Service Master Spare parts CF19 laptop+ +jcb diagnostic scanner tool JCB Electronic Service tool full set
03. Laptop CF52 CF-52 diagnostic tool for JCB Electronic Service Tool JCB ServiceMaster Data Link Adapter DLA
04. Excavator Diagnostic Tool for JCB Electronic Tool DLA Master Agricultural Diagnostic Scanner with CF 19 Laptop
05. Agricultural Construction equipment for JCB Electronic Service tool (DLA) JCB ServiceMaster heavy duty truck diagnostic tool
06. Heavy duty equipment Truck Diagnostic tool for JCB diagnostic v1.73.3 kit JCB Electronic Service diagnostic scanner tool
07. for JCB Electronic Service Master Tool Interface heavy duty truck excavator tractor diagnostic scanner tool
08. Excavator Diagnostic tool 1.73.3SPP for JCB Electronic Service tool for JCB ServiceMaster Excavator Agricultural Diagnostic
09. Diagnostic tool for jcb electronic service tool Construction equipment + JCB parts pro SPP Software
10. for JCB DIAGNOSTIC KIT (DLA) JCB Service Master Spare parts JCB Agricultural construction Diagnostic scanner tool
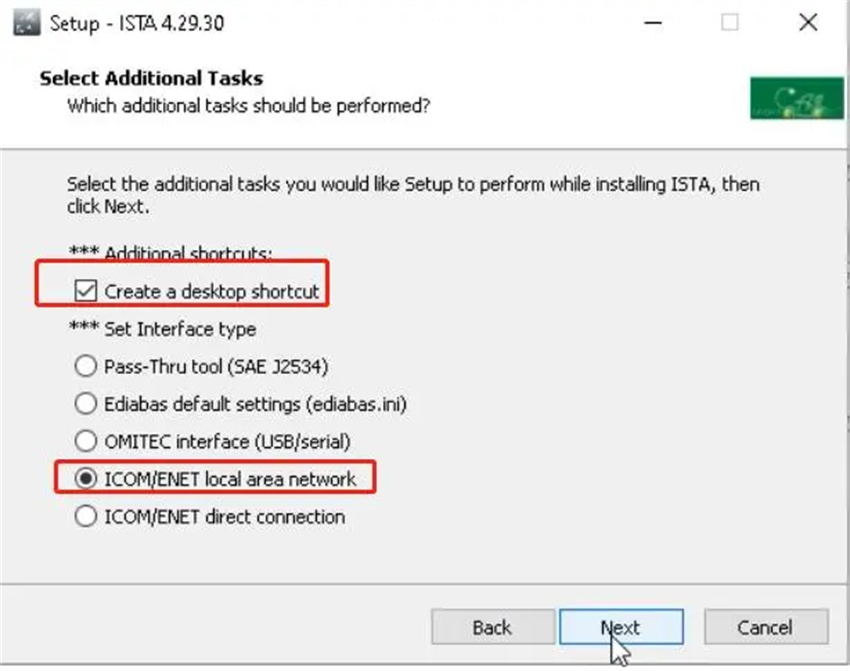
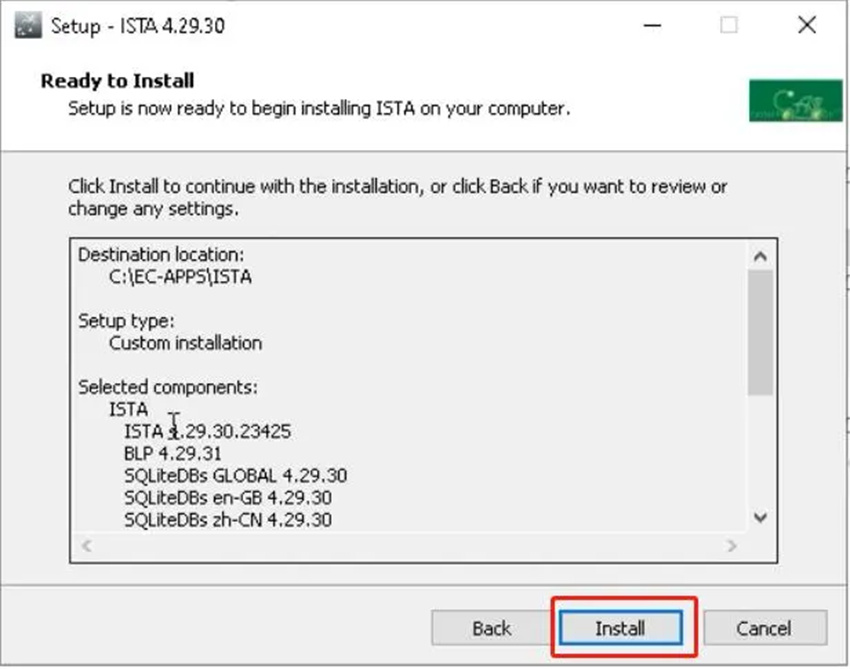
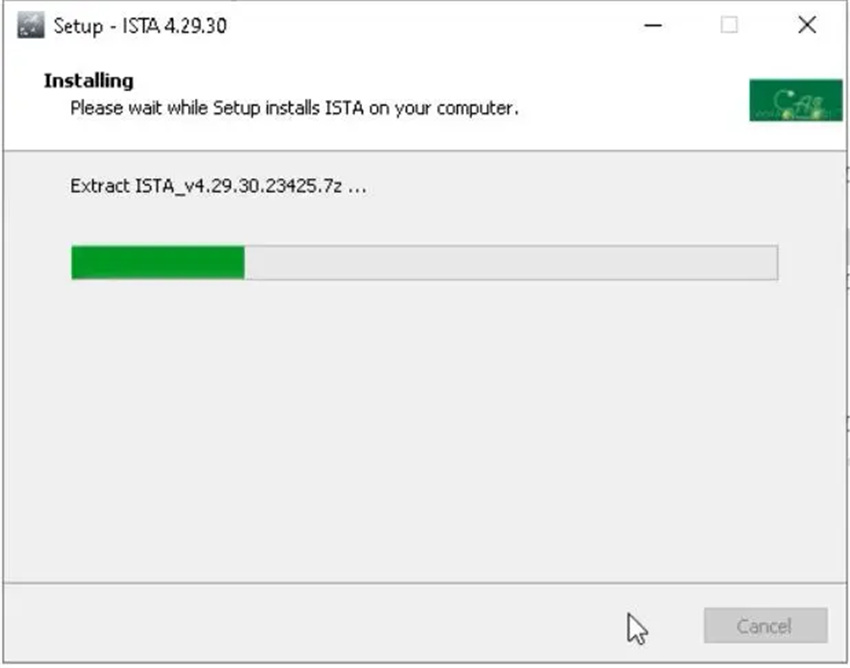
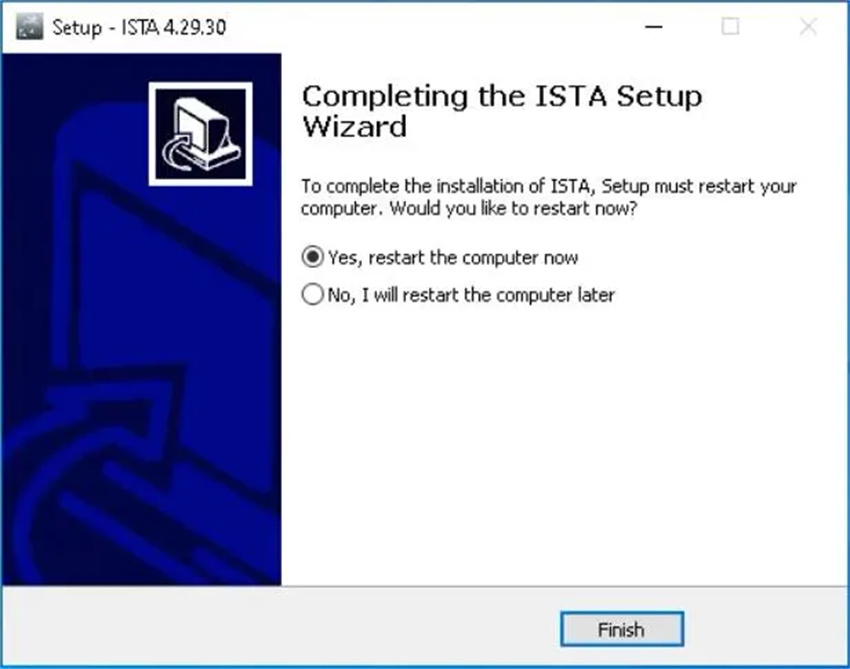
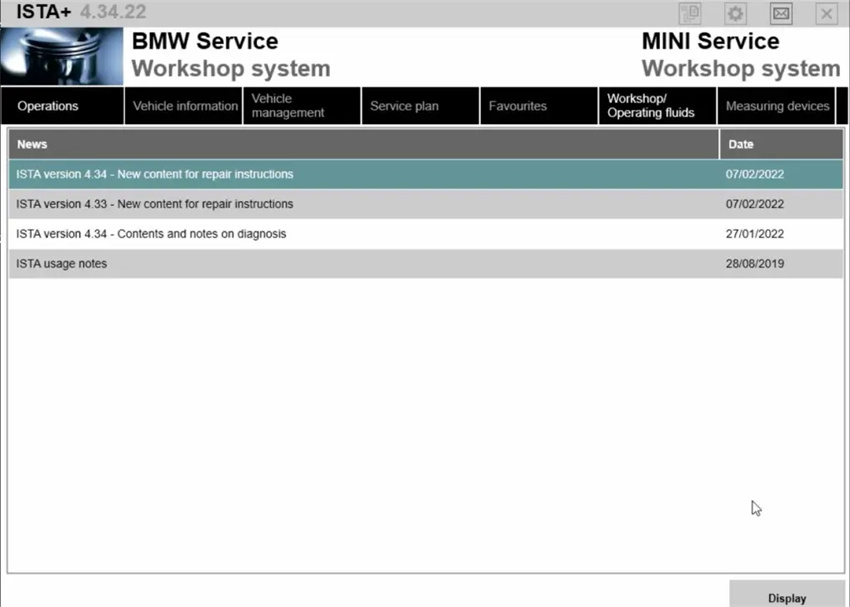
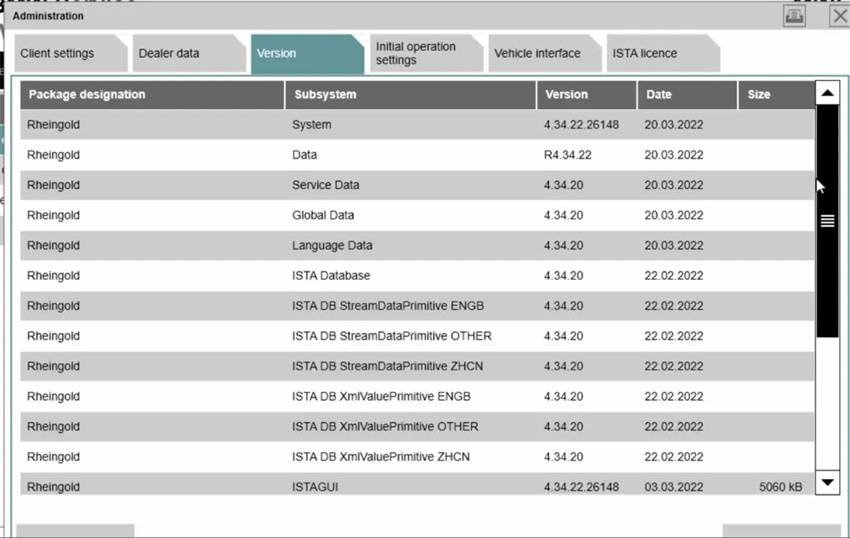
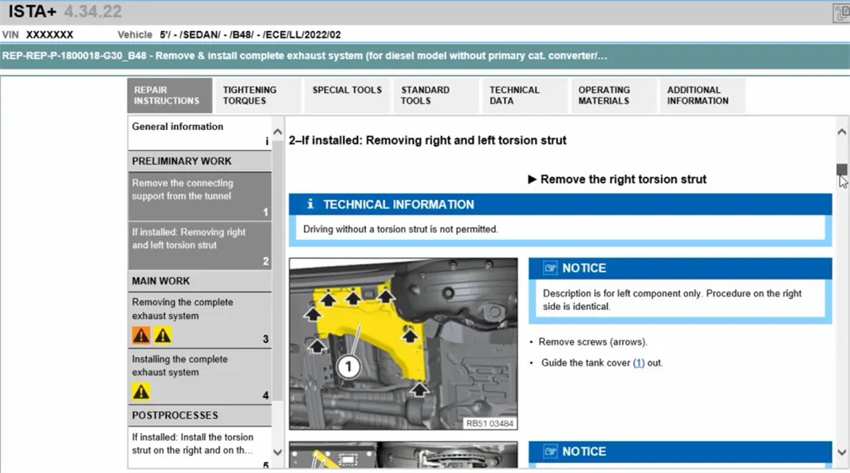
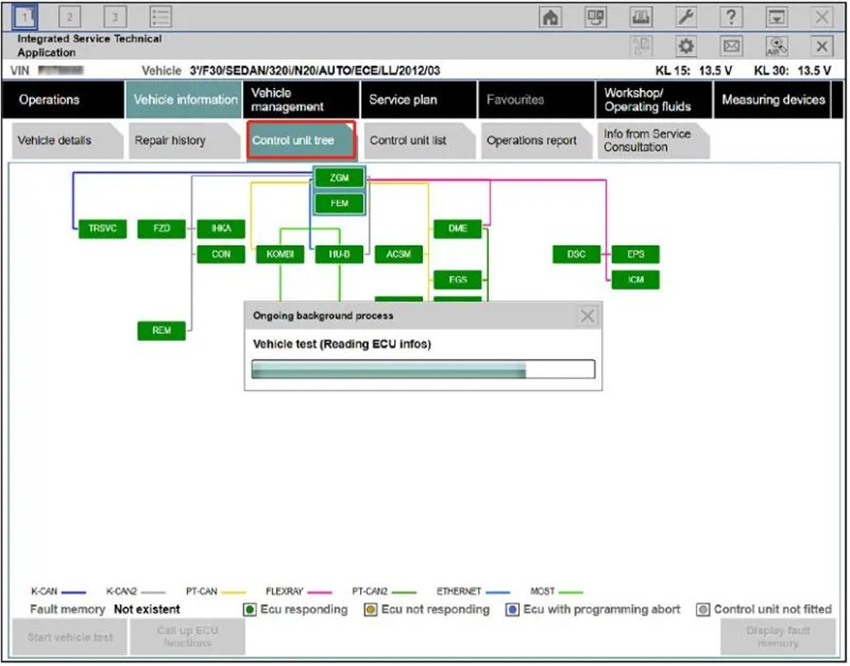
The ISTA-D Rheingold software available on this website allows full diagnosis of BMW E and F series vehicles. How to install ISTA-D BMW with 3.43 Rheingold standalone patch?
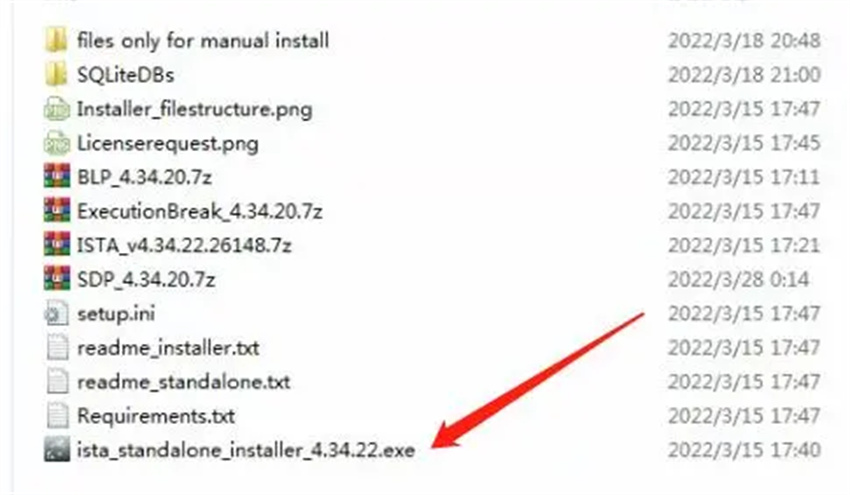
1.BMW ISTA download (143Gb) to your local laptop – download the installation package from the link at the beginning of this manual; – after downloading the package, right-click on it> Properties and in the window that will appear, check if there is no “Unzip” button in the lower right corner. If there is one, it must be pressed. Otherwise, after unpacking the files, some of them will be blocked and the program will not work. 2.Computer installation requirements: Windows 10/Windows 11 Running memory: 6G-8G Disk space: more than 110G, PSDZ database 300G (can choose to install) CPU: Main frequency 2.0Hz or higher 3.Remote system patches and activation support from us if you have paid for the ISTA 4.34
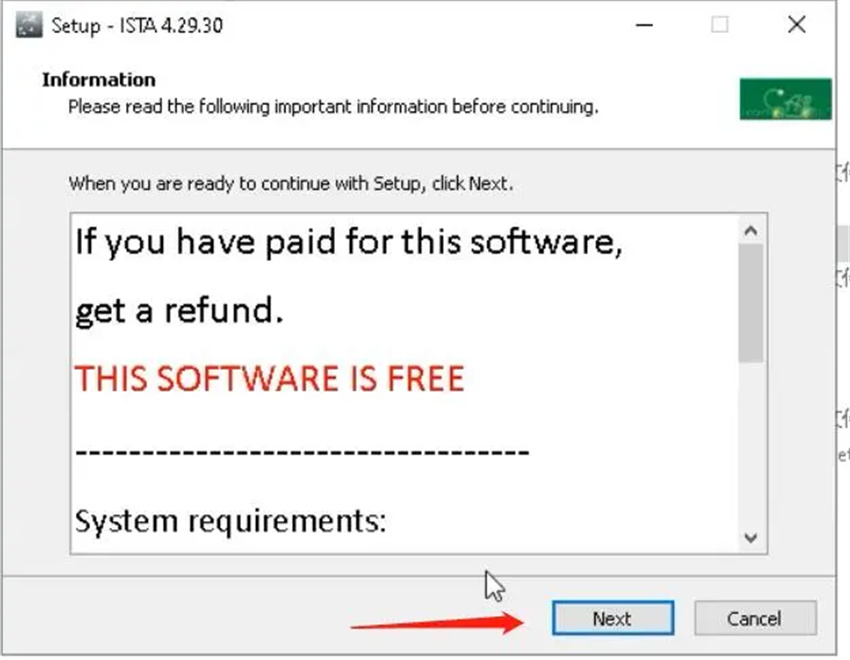
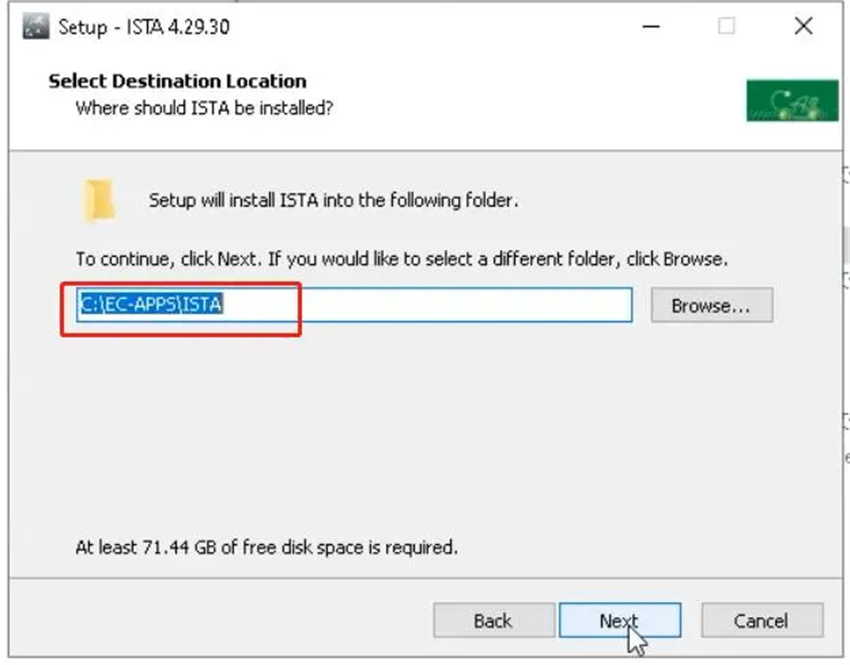
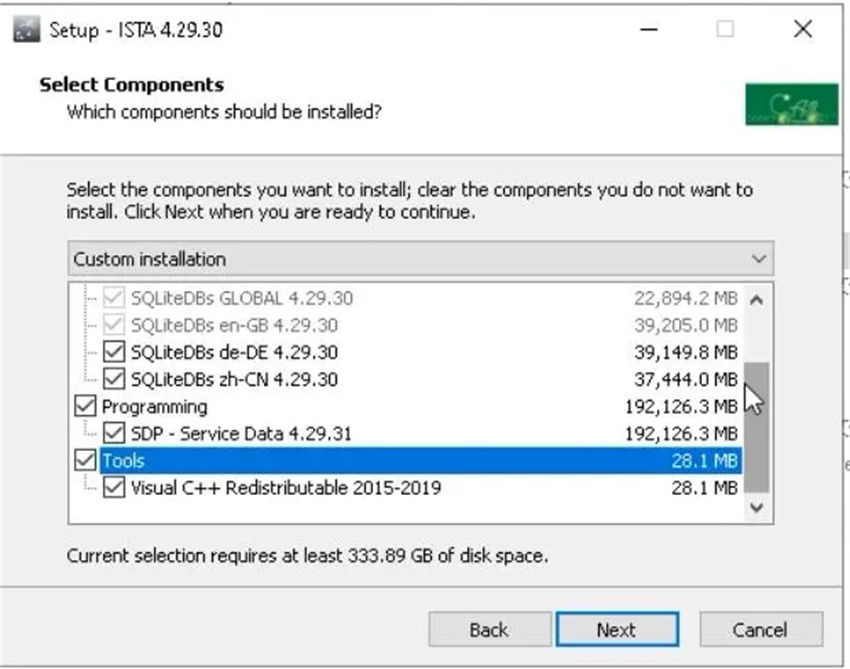
Note: for ISTA P, you still need to download the Psdzdatabase ISTA-D BMW Installation Process
ISTA-D BMW System V4.34.22
For more questions about BMW, please click: BMW ICOM NEXT
:: بازدید از این مطلب : 62
|
امتیاز مطلب : 7
|
تعداد امتیازدهندگان : 2
|
مجموع امتیاز : 2
تاریخ انتشار : چهار شنبه 16 شهريور 1401 |
نظرات ()